
Reversal of long-term posting in sap. For more information about selecting a document type, see the documentation for the Red Reversal field. Setting up correspondence in finance
This article discusses in detail SAP standard processes and what to do if you identify the need to reverse a payroll run. The method you use largely depends on where you are in the process. Once you understand this information, you can make the right decisions when choosing how to reverse a payroll run.
|
To understand what this article is about, readers should be familiar with the complex concepts of SAP Payroll. In other words, this article is not intended for beginners who do not have sufficient experience with SAP Payroll. |
|
For more information on this topic, I recommend attending the SAP WNAOC seminar, where the functionality of off-cycle workbench is discussed in detail in its entirety, including payroll reversal. Choose an SAP seminar on payroll for your country. For the USA this is HR410 - a seminar on payroll calculation in the USA, for Canada - HR407. For information about seminars for other countries or more information about any other SAP seminars, visit: https://training.sap.com/. |
|
For more information on the basics of payroll, see other articles in HR Expert: |
|
|
|
|
|
|
|
Reversal options in SAP Payroll
The first step toward understanding this functionality and the options for reversing or canceling a payroll run is to identify the step you are currently at in the overall payroll process flow. This information is of great importance for choosing ways to correct data in the system. To choose the optimal option for adjusting payments, you need to ask the following questions and determine the range of possible actions:
- Have you exited the payroll control record?
- Has the payroll been posted to Financial Accounting (FI)?
- Was the transfer made to a third party?
- Are you reversing the most recent payroll run or the previous one?
Determining whether to reverse payroll
The first question is important in determining whether a formal process is necessary to reverse a payroll. If you have already exited payroll, you have two options:
- Delete payroll results.
- Make corrections and run the payroll run again. When choosing the second option, you should perform the following sequence of actions:
- Update the master data to resolve the issue.
- Run the payroll run again.
It can be assumed that if the payroll control record was not exited, then the payroll posting or third party transfer was not executed either, since in the SAP system it is not possible to start a productive run of these processes before exiting the control record.
The choice between deleting payroll results and adjusting with a new payroll run depends on the reasons for reversing a run that has already been executed. If you need to correct the results, SAP recommends that you make the corrections and rerun the run. For example, if you wanted to enable salary increases, but you did not update the master data before running the payroll run, you need to do the following:
- Change the status of the control record to Released for Adjustment.
- Update infotype 8 to increase an employee's salary.
- Change the status of the control record to Released for Payroll.
- Run the payroll run again.
These steps will update the results and should resolve the issue.
You may only want to delete results if they were created in error. For example, you wanted to terminate an employee, but you did not process the termination event before running payroll. In this case, to correct the situation, do the following:
- Delete payroll results.
- Change the status of the control record to Released for Adjustment.
- Take action to terminate the employment contract.
- Change the status of the control record back to Released for Payroll.
At this stage, even after running the payroll again, this employee should not be used due to dismissal.
To delete the results of the payroll run, execute transaction PU01. For the purposes of this article, we will consider this process, since not everyone is familiar with it. The process of adjusting and rerunning payroll is not described here because it is generally something that all payroll administrators should be familiar with.
You can delete payroll results for only one employee per operation. First, run transaction PU01 and enter the personnel number of the employee for whom you want to delete the payroll results, see Rice. 1. After entering the number, select the progress icon. The screen shown in rice. 2. Here you can check the results you want to delete. Select the line with the employee’s personnel number and click the “Delete” button.
Rice. 1. Entering a personnel number for the payroll results that you want to delete

Rice. 2. Deleting payroll results in transaction PU01
A pop-up screen will appear asking you to confirm deleting the payroll results. (Fig. 3). Click Yes.

Rice. 3. Confirmation of deletion of payroll results in transaction PU01
The screen will appear (Fig. 4) with a message that the results were successfully deleted.
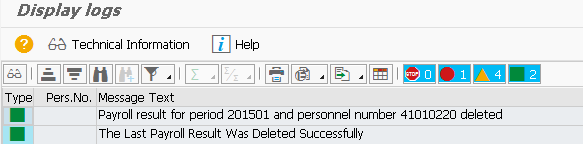
Rice. 4. Screen indicating that payroll records were successfully deleted
However, what if you are already out of payroll? What options exist in this case? At this stage, there are three possible scenarios for choosing how to solve this problem. Let's look at each of them.
An overview of three possible scenarios:
- The payroll exit was completed, but posting and transfer to a third party were not performed.
- The payroll exit has been completed, the posting run has been completed, but the transfer to a third party has not been carried out.
- The payroll run has been exited, the posting run has been completed, the transfer to a third party has been completed, or you want to reverse the payroll run from the previous period (for example, not the most recent run, but the previous one).
For the third scenario, let's assume that for any payroll run that is not the most recent one, a posting to Financial Accounting and a third party transfer run (otherwise known as 3PR) is made, since before you can start working with the current period, you must post and transfer to a third party for any calculations salaries in the past.
Scenario 1
For the first scenario, in which payroll is exited but the posting and transfer to a third party is not, use the off-cycle workbench and payment reversal functionality.
Execute transaction PUOC_10 and open the “Reverse payment” tab (Fig. 5). Then select the payment to be reversed (in this case, check number 0000000000402) and the reason for reversal (in this case, “Theft”).

Rice. 5. Reversing a payment using off-cycle tools
Click the "Cancel" button. A pop-up screen will appear indicating that the cancellation will not be possible and asking you to confirm whether to proceed. (Fig. 6). Click Yes.

Rice. 6. Cancellation confirmation message when reversing a payroll calculation
In off-cycle workbench, go to the History tab (Fig. 7) and check that the cancellation is complete. To do this, make sure that the indicator is set in the “Canceled” field.

Rice. 7. Off-Cycle Workbench: History Tab with Reversed Payroll
Once the payroll reversal has been confirmed, this can be checked on the FI side. To do this, perform the FCHN transaction and search for payroll checks ( rice. 8). Enter payment details, such as the company code that made the payment. Next, set the “Payroll checks” indicator and select the execution icon.
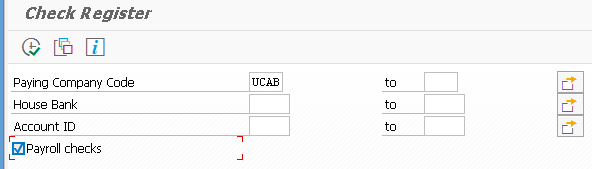
Rice. 8. Checking payroll reversal in FI
Once you find the check number corresponding to the reversed payment (in this case the check number is 0000000000402, see Rice. 7), you can view the details of the canceled check on the FI side by clicking on it. All relevant information for the voided check should appear, as shown in rice. 9.

Rice. 9. Canceled Check Details
At this point, the reversal process is complete because there are no more payroll posting or third party remittance activities in this scenario. The payroll check has been cancelled, all results posted and amounts transferred to suppliers have been corrected.
Scenario 2
Would you like to see the full version of the article?
If you are a subscriber to SAP Professional Journal, please log in to the site.
If you would like to subscribe to SAP Professional Journal, please contact the editor or place an order on the website.
General finance setup
- Copying data from standard company code (CO) RU01 to a new company code. The chart of accounts, currency and other settings are copied.
- Menu: SPRO-Enterprise structure-Definition-Finance-Processing, copying, deleting company codes.
- Select the item Copy, delete, check company account.
- On the screen, go to the menu Organic object - Copy organic object. Select RU01 and specify a new company account (4 characters). Press Enter.
- To the question Do you agree to copy the company code data of the main accounts? We answer Yes.
- To the question Do you agree to assign another currency? We answer No. (We need RUB)
- Press Enter.
- Changing the created company code.
- Menu SPRO-Enterprise structure-Definition-Finance-Processing, copying, deleting company codes.
- Select the item Processing company data.
- We highlight our BU. Double click on it.
- Enter the company name, city, country, currency, language.
- Click Save.
- Definition of Company.
- Menu: SPRO-Enterprise Structure-Definition-Finance-Company Definition
- Click the New Records button.
- Enter the code (4 characters), name, street, country, city, language, currency.
- Click Save.
- Assignment of a company to a company code.
- Menu: SPRO-Finance-Settings Options Finance-Checking and adding global parameters
- Double click on our BU.
- In the Company field, enter our company.
- Uncheck the Business Spheres Balances box.
- Click Save.
- Creating a Controlling Area
- Menu: SPRO-Enterprise structure-Definition-Controlling-KE maintenance
- Select the item KE maintenance
- Click the New entries button
- Enter the key code (4 characters), name, assignment control, currency type, currency, chart of accounts, fiscal year variant
- Click Save.
- Assignment of company code to a controlling area.
- Menu: SPRO-Enterprise structure-Assignment-Controlling-Assignment of company code to a controlling area.
- On the right, select the controlling area.
- On the left, double-click on the Assignment to Company Account menu.
- Click New entries.
- We enter our BU.
- Click Save.
- Assignment of financial year variants to company codes. For example, a financial year is 12 months and 4 special periods for closing the year.
- Menu: SPRO-Finance-Settings Financials-Books-Fiscal year and posting periods-Assignment of company code to fiscal year variant.
- Assign our company code Option fiscal year K4 (12 months + 4 special periods).
- Save
- Checking and adding company account parameters.
- Menu: SPRO-Finance-Settings parameters Finance-Global parameters for company account-Checking and adding global parameters.
- Double click on BE.
- Enter and check the data: CARU chart of accounts, ZUCH company, fiscal year var. K4, field status option 0001, posting period option 0001, etc.
- Click the Additional data button.
- Enter on the second page the TIN, OKPO, OKVED, OKFS, OKOPF, KPP, OGRN, full name of the director, full name of the chief accountant.
- Save.
- View the chart of accounts.
- Run trans SE38 report RFSKPL00.
- Or run trnaz S_ALR_87012326.
- Fill in the Chart of Accounts field (for example CARU).
- Click Run (Clock icon, F8).
- View the chart of accounts for company codes.
- Run trans SE38 and report RFSKVZ00.
- or Start trans S_ALR_87012328.
- Fill in the Chart of Accounts, Company Account field.
- Click Run.
- Translation of the name of the main account into Russian.
- Start transaction SMLT.
- Click the Replenish language button.
- Check the Fill in client-independent tables checkbox.
- Check the Fill in client-dependent tables checkbox.
- Click the button on the right Run. Long wait.
- Translation of the name of the main account into Russian. Part 2.
- Menu: S000-Accounting and reporting-General ledger-Master data-G/L accounts-Creation and processing of G/L accounts-Processing of G/L accounts (separate processing)-Processing chart of accounts data.
- Or transaction FSP0.
- Enter the main account number and chart of accounts.
- Select Change.
- Select the Keyword/translation tab.
- Enter the translation of short and long text into the required languages in the Translation field group.
- Save.
- Creating a General Ledger Account.
- Indicate the new account number and company code.
- Click - By sample.
- Indicate the sample invoice number and company code.
- To change the data. Delete Alternate Account Number on the Control Data tab.
- Save.
- Change, view the General Ledger account.
- Menu: S000-Accounting and reporting-Finance-General ledger-Master data-G/L accounts-Separate processing.
- Transaction FS00 - centrally.
- Indicate the account number and company code.
- To change the data.
- Save.
- Activate the display of line items for an account. Activates viewing of either detailed invoice data or total data. (Do not run yet)
- In transaction FS02, block the account.
- Run report RFSEPA01.
- Creating a profit center
- Menu: S000-Accounting and reporting-Finance-General ledger-Master data-Profit center-Separate account-Create
- Menu: Additional info-Set KE. Enter the required KE.
- Enter the profit center and press Enter.
- Enter a name, etc.
- Save and activate.
- Not created - no standard. hierarchy
- Creation of accounts receivable groups.
- Select DEBI and click Copy.
- Press Enter and Save.
- Assigning a range of numbers for groups of accounts receivable (i.e., for debtors).
- Menu SPRO-Finance-Accounting. debtors and creditors-Accounts receivable-Master data-Preparation of input-Assignment of number ranges.
- Save.
- Creating groups of accounts payable.
- Select KRED and click Copy.
- Enter a new 4-digit code, rename.
- Press Enter and Save.
- Assigning a range of numbers for groups of accounts payable (i.e., for creditors).
- Menu SPRO-Finance-Accounting. debtors and creditors-Accounts payable-Master data-Preparation of input-Assignment of number ranges.
- Enter the desired range opposite our account group.
- Save.
- Displaying additional fields in the debtor.
- Menu SPRO-Finance-Accounting. debtors and creditors-Accounts receivable-Master data-Preparation of input-Define account groups.
- Select our account group ZDEB, double click on it.
- Select Control
- Save
- Menu SPRO-Finance-Accounting. debtors and creditors-Accounts receivable-Master data-Input preparation-Define screen structure depending on transaction
- Select Customer Entry.
- Select General Data.
- Select Manage.
- It is optional to enter the Tax number 3 field next to it. input.
- Save
- Creating a customer
- Menu: S000-Accounting and reporting-Finance-Debtors-Master data-Create
- Or trans. FD01
- Enter a group of accounts for example ZDEB and company account for example ZUCH and press Enter.
- On the General Data screen, enter address data.
- On the Control data screen, enter INN, KPP, GLN.
- Click the Company Account Data button.
- Enter the control account, for example 62001100.
- Save
- Creation of Accounts of different persons for one-time debtors.
- Menu: S000-Accounting and reporting-Finance-Debtors-Master data-Create.
- Or trans. FD01.
- Enter the Debtor number, for example CPD01, company account, for example ZUCH, account group CPDA and press Enter.
- On the Basic Data tab, enter the name of the Account of different persons and press Enter.
- On the Accounting tab, enter Control Account, for example 62001100.
- Save.
- Setting up the international version of the address for the debtor.
- Transaction SM30. View V_SAPTSADV.
- Create a new entry, activate, save.
- When maintaining an address in the customer master data, the "International Versions" button appears. When you click it, you can enter the address in another language.
- Displaying additional fields in the lender.
- Menu SPRO-Finance-Accounting. debtors and creditors-Accounts payable-Master data-Preparation of input-Define account groups.
- Select our account group ZKRE, double click on it.
- Select Control
- It is optional to enter the Tax number 3 field next to it. input.
- Save
- Menu SPRO-Finance-Accounting. debtors and creditors-Accounts payable-Master data-Input preparation-Define screen structure depending on transaction
- Select Creditor Entry.
- Select General Data.
- Select Manage.
- It is optional to enter the Tax number 3 field next to it. input.
- Configure Change and View in the same way.
- Save.
- Creation of a lender.
- Or trans. FK01.
- Enter a company code, for example ZUCH, a group of accounts, for example ZKRE, and press Enter.
- On the Basic Data tab, enter the address data and press Enter.
- On the Management tab, enter the TIN, KPP, GLN, debtor.
- Save.
- Creation of Accounts of different persons for one-time creditors.
- Menu: S000-Accounting and reporting-Finance-Creditors-Master data-Create.
- Or trans. FK01.
- Enter the creditor number, for example CPK01, company code, for example ZUCH, account group CPDL and press Enter.
- On the Basic Data tab, enter a name, for example Accounts of different persons - creditors and press Enter.
- On the Accounting tab, enter Control Account, for example 60001100.
- Save.
- Entering number ranges for fin. documents.
- Menu: SPRO-Finance-Settings Finance-Document-Ranges No. Doc-Documents in input view-Define range numbers: registration view.
- Enter the company code and click Change intervals.
- Click the Insert Row button.
- Enter range number, year, ranges, external flag. numbering.
- Save.
- Assigning a range of numbers to a financial document.
- Double-click on the document view.
- Enter a value in the Range field.
- Save.
- Check availability of document types
- Menu: SPRO-Finance-Settings parameters Finance-Document-Document types-Define document types. registration angle.
- KR - creditor account
- RE - creditor account in MM
- KZ - payment to the creditor
- DR - account receivable
- RV - account receivable in SD
- DZ - debtor payment
- SA - postings according to the main account.
- Maintaining transaction codes.
- Menu: SPRO-Finance-Financial Settings-Document-Define Posting Codes.
- Place the cursor on a line.
- Menu: Edit-Change name.
- Press Enter
- Opening and closing posting periods.
- Menu: S000-Finance-General Ledger-Environment-Current Settings-Opening and Closing Posting Periods.
- For range 0001, specify posting periods and special periods.
- Save.
- Introduction of a control indicator and financial year for financial units.
- Menu: SPRO-Controlling-General Controlling-Organization-KE Maintenance.
- Select KE maintenance.
- Select the required KE for example ZRUS.
- Double click on the item Activate components/control indicator.
- Set the fiscal year.
- Save.
- Determining access groups for employees.
- Menu: SPRO-Finance-Financial Settings-Document-Access Groups-Define Access Groups for Employees.
- Click the New records button.
- Enter a tolerance group, for example empty, company code, for example ZUCH, upper limits for postings, for example 999999.
- Save.
- Pre-registration of the document.
- Transaction FB50.
- On the Header tab, enter the document date, posting date, reference (external number), and SA document type.
- On the Positions tab, enter the main account number, for example 51100000, credit indicator, amount.
- On the Positions tab, enter the main account number, for example 50101000, the debit indicator, the amount.
- Save.
- Posting a document.
- Transaction FBV0.
- Enter company code, document number, year.
- Save.
- View the document.
- Transaction FB02.
- Enter company code, document number, year.
- Press Enter.
- Setting up an option for viewing a document.
- If FB02 gives error Option AA is not provided in table T021V, then
- Transaction SE16.
- Specify table T021T (not a typo!).
- Copy the EN AA entry to the RU AA entry.
- Save.
- Maintain VAT codes for the country.
- Enter Country RU.
- Enter VAT code for example PA
- For the corresponding tax (incoming or outgoing), enter a rate of, for example, 18%.
- Click the Account button.
- Enter the main account number and press Enter.
- Save.
- Creating a VAT code.
- Menu SPRO-Finance-Settings Options Finance-Varue Tax-Calculation-VAT Code Definition.
- Enter Country RU.
- Enter the VAT code for example PZ.
- Enter the name (Input VAT 0% according to the mat), type of tax (incoming, outgoing) and press Enter.
- For the corresponding tax (incoming or outgoing), enter a rate for example 0%.
- Click the Account button.
- Specify a chart of accounts, for example CARU.
- Enter the main account number, for example 19100001 (Input VAT 0% on the mat) and press Enter.
- Save.
- Setting the red reversal (reverse wiring without revolutions).
- Menu SPRO-Finance-General Ledger Accounting-Business Transactions-Adjustment Entry/Reversal-Resolution of Red Reversal.
- Opposite the company code, check the box Red reversal is allowed.
- Save.
- Set up reasons for reversal.
- Menu SPRO-Finance-General Ledger Accounting-Business Transactions-Adjustment Entry/Reversals-Determining Reasons for Reversals
- Click the New records button.
- Enter a new code, name, and check the Red reversal box.
- Save.
Setting up correspondence in finance
When printing in program J_3RF_INV_A, an error occurs: "The default form entry is missing in the ZUCH company code for program J_3RF_INV_A. Message no. FB595."
- Definition of the type of correspondence for s-f.
- Trans. OB77.
- Select SAPR3. Double click.
- Check the Required document entry checkbox.
- Save.
- Determining the type of correspondence for adjustment accounts.
- Menu: SPRO - Finance - Settings - Correspondence.
- Trans. OB77.
- Click New entries.
- Enter the correspondence code ZCORR, do not check the boxes.
- Save.
- Creating report options for correspondence s-f.
- Enter the program J_3RF_INV_A.
- Launch.
- Enter correspondence code SAPR3, form ID EI.
- Click Save.
- Create screen variant SAPR3 for program J_3RF_INV_A. Enter the SAPR3 variant name and click Save.
- Creation of report options for correspondence of adjustment accounts.
- Menu: SPRO - Finance - Settings - Correspondence - Create report options for correspondence.
- Enter the program J_3RF_CORRINV_A.
- Launch.
- Enter correspondence code ZCORR, form ID EI.
- Click Save.
- Create screen variant FICORR for program J_3RF_CORRINV_A. Enter the option name FICORR, click Save.
- Assigning reports to a correspondence type.
- Menu: SPRO - Financials - Settings - Correspondence - Assigning reports to correspondence type.
- Click New entries.
- Enter empty company code, correspondence code SAPR3, print program J_3RF_INV_A, variant name SAPR3.
- For adjustment accounts, enter empty company code, correspondence code ZCORR, print program J_3RF_CORRINV_A, variant name FICORR.
- Save.
- Defining calling capabilities.
- Menu: SPRO - Finance - Settings - Correspondence - Call Capability Definition.
- Click New entries.
- Enter empty company code, correspondence code SAPR3, check all the boxes.
- For adjustment s-f, enter empty BU, correspondence code ZCORR, check all the boxes.
- Save.
- Defining SAPscript form names for printing correspondence.
- Menu: SPRO - Finance - Settings - Correspondence - SAPscript-based forms.
- Click New entries.
- Enter empty company code, program J_3RF_INV_A, ID. form 01, form J_3RVINVOICE.
- Save.
- Defining PDF form names for printing correspondence.
- Menu: SPRO - Finance - Settings - Correspondence - PDF-based forms.
- Click New entries.
- Enter empty company code, program J_3RF_INV_A, ID. EI form, the form is empty.
- Enter empty company code, program J_3RF_CORRINV_A, ID. EI form, empty form for adjustment s-f.
- Enter empty company code, program J_3RF_INV_A, ID. form 02, form J_3RF_DINV.
- Save.
Materials Management (MM)
- Factory copying.
- Select the menu item Copy, delete, check factory.
- Select the menu item Organizational object-Copy org. an object.
- Enter a reference plant, for example 0001, a new plant, for example Z001.
- Press Enter.
- Changing plant address data.
- Menu SPRO-Enterprise structure-Define-General logistics-Define, copy, delete, check plant.
- Select the menu item Define plant.
- Double click on the plant field.
- Click the Address button.
- Enter name, address.
- Save.
- Warehouse definition
- Menu SPRO-Enterprise structure-Definition-Materials management-Warehouse management
- Enter plant Z001.
- Click the New records button.
- Enter the warehouse number, for example 0001, the name Warehouse 0001.
- Save.
- Definition of purchasing organization.
- Menu SPRO-Enterprise structure-Definition-Materials management-Maintaining purchasing organization
- Click the New records button.
- Enter a code, for example Z001, enter a name.
- Save.
- Assignment to Plant-BU.
- Menu SPRO-Enterprise structure-Assignment-General logistics-Assignment Plant-BU.
- Click the New records button.
- Enter the company code and plant.
- Save.
- Assignment Purchasing organization-company.
- Menu SPRO-Enterprise structure-Assignment-Material flow management-Assignment ZakOrg-BU.
- Assign purchasing organization Z001 to the company code ZUCH.
- Save.
- Assignment Purchasing organization-Plant.
- Menu SPRO-Enterprise structure-Assignment-Material flow management-Assignment ZakOrg-Plant.
- Click the New records button.
- Enter purchasing organization Z001 and plant Z001.
- Save.
- Assignment Standard Purchasing Organization-Plant.
- Menu SPRO-Enterprise structure-Assignment-Material flow management-Assignment StandardZakOrg-Plant.
- Click the New records button.
- Assign purchasing organization Z001 to plant Z001.
- Save.
Setting up general logistics
Setting up a material master record
- Maintaining company codes for managing material flows (posting periods).
- Menu SPRO-General Logistics-Material Master Records-Basic Settings-Maintaining Company Accounts for Material Flow Management.
- Select BU.
- Enter the year and month - the allowed posting periods.
- Check the box Posting to the previous period.
- Save.
Setting up batch control
- Activation of batch numbering.
- Menu SPRO-General Logistics-Batch Management-Batch Numbering-Activation of Batch Numbering.
- Select Activate batch numbering.
- Select Activate.
- Save.
- Select the item Internal lot numbering for assigned goods receipt.
- check the box next to the plant.
- Save.
Setting up materials management
Setting up purchases
- Define partner selection for hierarchy type.
- Menu: SPRO-Material Flow Management-Purchasing-Supplier Master Records-Supplier Hierarchy-Define Partner Selection for Hierarchy Type.
- Click New entries.
- Enter the role LF supplier, account group ZKRE.
- Save.
- Defining the role of the forwarder for creating/invoicing SD Transportation.
- Menu: SPRO-Material Flow Management-Purchasing-Supplier Master Records-Supplier Hierarchy-Define Partner Selection for Hierarchy Type.
- Select Allowed partner roles by account groups.
- Click New entries.
- Enter the role RS Invoice issuer, account group 0005 Forwarder.
- Save.
- Create the Purchasing and Partner Roles views for the vendor.
- Menu: S000-Logistics-Operational logistics-Master data-Partners-Supplier-Create.
- Transaction XK01.
- Enter vendor code 1, company code ZUCH, purchasing organization Z001.
- Press Enter.
- Enter the order currency RUB on the Purchasing screen and press Enter.
- Enter the partner role LF supplier, vendor code 1 on the Partner Roles screen.
- Save.
Setting up inventory management and inventory
- Changing factory settings.
- Menu SPRO-Materials Management-Inventory Management and Inventory-Plant Parameters.
- Double click on the Factory field.
- Change settings and save.
- Setting up the selection of fields for the type of movement and account.
- If, when posting a movement of material, it swears “The selection of fields for airborne 501 account 90300000 does not match.”
- Program RM07CUFA.
- Enter movement type 501, account 90300000.
- Click the Run button.
- Find the lines highlighted in red and click twice.
- Set the visibility of fields.
- Save.
Setting up valuation and account assignment
- Define price control for material types.
- Activation of split assessment.
- Menu SPRO-Materials Management-Valuation and Account Assignment-Account Selection-Account Selection without Assistant
- Definition of assessment management.
- Menu SPRO-Materials Management-Valuation and Account Assignment-Account Selection-Account Selection without Assistant
- Grouping of assessment areas.
- Menu SPRO-Materials Management-Valuation and Account Assignment-Account Selection-Account Selection without Assistant-Grouping Valuation Areas.
- Enter the constant 0002 for the depreciation area ZUCH, company code ZUCH, chart of accounts CARU.
- Save.
- Definition of assessment classes
- Menu SPRO-Materials Management-Valuation and Account Assignment-Account Selection-Account Selection without Assistant-Define Valuation Classes.
- Select Valuation Class.
- Click New entries.
- Enter the valuation class and reference account class.
- Save.
- Setting up automatic postings for stock postings (BSX).
- Transaction OBYC.
- Click the Account Assignment button.
- Double click on BSX.
- Select the CARU chart of accounts.
- Click New entries.
- Enter Valuation Modifier 0002, valuation class for example 1060, balance sheet account for example 10600000.
- Save.
- Setting up automatic postings for recalculation of MR/PS (WRX).
- Menu SPRO-Materials management-Valuation and account assignment-Select account-Select account without assistant-Setting up automatic postings.
- Transaction OBYC.
- Click the Account Assignment button.
- Double tap on WRX.
- Select the CARU chart of accounts.
- Click New entries.
- Enter Valuation Modifier 0002, valuation class for example 1060, balance sheet account for example 15101000.
- Save.
- Setting up automatic postings for moving inventory between company codes.
- Transaction OBYA (T030 VRB+BUV).
- Enter BE1 and BE2.
- For BU1 for accounts receivable, enter the posting code, for example 40, and the account, for example 41999000 goods in transit.
- For BU1 for accounts payable, enter the posting code, for example 50, and the account, for example 41999000 goods in transit.
- For BU2 for accounts receivable, enter the posting code, for example 40, and the account, for example 41999000 goods in transit.
- For BU2 for accounts payable, enter the posting code, for example 50, and the account, for example 41999000 goods in transit.
- Save
Setting up account control
- Activation of direct posting to the main account and material account.
- Menu SPRO-Material Flow Management-Account Control-Incoming Invoice-Activation of direct posting to the main account and material account.
- Click the New records button.
- Check the box Direct posting to G/L account.
- Check the Direct posting to material account checkbox.
- Save.
- Maintain default values for tax codes.
- Menu SPRO-Materials Management-Invoice Control-Incoming Invoice-Maintain Default Values for Tax Codes.
- Click the New records button.
- Enter company code, default VAT codes.
- Save.
- Determination of tolerance limits.
- Menu: SPRO-Material Flow Management-Account Control-Blocking-F-Determination of Tolerance Limits.
- Copy or create entries.
- Enter company codes, deviation codes, deviation values.
- Save.
Sales (SD)
Course SCM600 Sales processes.
Course SCM605 Sales.
Course SCM610 Shipping.
Course SCM615 Invoicing.
Setting up an enterprise structure
- Creation of a sales organization
- Menu SPRO-Enterprise structure-Definition-Sales-Definition, cop, delete, check the sales organization.
- Select Sales Organization Definition
- Select line 0001.
- Click Copy.
- Enter code, name, currency, calendar.
- Save.
- Creation of a Sales Channel
- Menu SPRO-Enterprise structure-Definition-Sales-Definition, cop, delete, check the distribution channel.
- Select Distribution Channel Definition.
- Click New entries.
- Enter code, name.
- Save.
- Assignment Sales organization - Company code.
- Menu SPRO-Enterprise Structure-Assignment-Sales-Assignment Sb.Org - Company Account.
- Enter company code for the sales organization.
- Save.
- Assignment Distribution channel - Sales organization.
- Menu SPRO-Enterprise structure-Assignment-Sales-Assignment sales channel-sales organization.
- Click New entries.
- Enter code SbOrg, sales channel.
- Save.
- Assignment Sector - Sales organization.
- Menu SPRO-Enterprise structure-Assignment-Sales-Assignment sector-sales organization.
- Click New entries.
- Enter code SbOrg, sector.
- Save.
- Formation of a sales market.
- Menu SPRO-Enterprise structure-Assignment-Sales-Formation of sales market.
- Click New entries.
- Enter code SbOrg, sales channel, sector.
- Save.
- Assignment Sales organization - distribution channel - plant.
- Menu SPRO-Enterprise structure-Assignment-Sales-Assignment sales organization - distribution channel - plant.
- Click New entries.
- Enter code SbOrg, sales channel, plant.
- Save.
- Creating a Shipping Point
- Menu SPRO-Enterprise structure-Definition-Operational logistics-Definition, cop, delete, check the shipping point.
- Select Define Shipping Point.
- Click New entries.
- Enter code, name, time, texts, address.
- Save.
General sales settings
General sales settings
- Setting up partner selection.
- Menu SPRO-Sales-Basic functions-Partner selection-Configure partner selection.
- Select the item Configure partner selection for customer master data.
- Go and configure the Recoding partner role item. Remove duplicate names in Russian. by renaming it in English.
- Go and configure the Assignment of partner role scheme item. For the customer account group ZDEB, set the partner role scheme AG Customer.
- Go and configure the Account group - role assignment item. Create records AG Ordering party - ZDEB, RE Invoice recipient - ZDEB, RG Payer - ZDEB, WE Material recipient - ZDEB.
- Save.
- Creating a Client.
- Menu S000-Logistics-Sales-Master Data-Business Partner-Customer-Create
- Transaction VD01
- Enter Account Group ZDEB, Debtor 100000, Sales Market ZUCH, Sales Channel Z1, Sector Z2.
- Enter sales area, price group, customer scheme.
- Enter tax trigger 1.
- Enter customer code 100000 for the partner roles Customer, Invoice Receiver, Payer, Material Receiver.
- Save.
- Create a Forwarder in SD (for SD Transportation).
- Menu S000-Logistics-Sales-Master Data-Business Partner-Forwarder-Create.
- Transaction V-11.
- Enter Creditor EXP0000001, company code ZUCH, account group 0005 Forwarder.
- Enter Name, Search Criteria 1 (TIN), address, RegTax Number 1 (TIN), RegTax Number 3 (KPP), control account 60001100,
- Save.
- Creating a Forwarder in MM (for SD Transportation).
- Menu S000-Logistics-Flow Management-Purchases-Master Data-Supplier-Centralized-Create.
- Transaction XK01.
- Enter Creditor EXP0000001, Company code ZUCH, Purchasing organization ZUCH, account group 0005 Forwarder.
- On the Partner Roles tab, enter Role LF Supplier, Vendor EXP0000001.
- On the Partner Roles tab, enter Role RS Invoice, Vendor EXP0000001.
- Save.
- Determining the rules for choosing taxes.
- Menu: SPRO-Sales-Basic functions-Taxes-Define tax selection rules.
- For the country RU, the tax type MW01 is configured in the standard.
Setting up pricing calculations - standard
- Definition of condition tables.
- Definition of types of conditions.
- The standard has configured the condition type MWST Output tax with the access sequence MWST.
- For sales org. ZUCH, distribution channel Z1, sector 01, document A, customer scheme 1, enter costing scheme RVAA01, condition type PR00.
- Save.
- Transaction VK31.
- Select Taxes.
- Double click on MWST.
- Save.
- Assignment of account codes.
- Click New entries.
- Save.
Setting up pricing calculations - Russia
Note. In VK11, to create a condition for the RVAARU scheme (for Russia), you need to specify the tax code as condition MW01 for the combination of country, tax classification of the debtor and tax classification of the creditor. The situation is complicated by the fact that in ERP 6.0 the tax code field for MW01 is not available for entry by default - you need to break the screen, about which there is note 396534 "Condition maintenance: tax indicator and tax trigger". It is solved by creating your own condition table 502, indicating it in the access sequence and creating a condition for it. The VAT code in the new condition table is available for entry.
- Creation of condition tables for the RVAARU MW01 scheme (for Russia).
- Menu SPRO-Sales-Main functions-Price calculation-Management of price calculation-Define condition tables.
- Select Create condition tables.
- Enter Table for example 502, reference condition 002. (Copy table 002 to table 502).
- Uncheck With release status.
- Click the Maintain text button and enter the name of the table Z_Domestic taxes.
- Click Generate.
- Definition of types of conditions.
- Menu SPRO-Sales-Main functions-Price calculation-Management of price calculation-Define condition types.
- The standard configures the access sequence MW01 Tax Trigger with the access sequence MWST.
- Define access sequences for calculating prices.
- Menu SPRO-Sales-Basic functions-Price calculation-Price calculation management-Define access sequences.
- Select Maintain access sequences.
- Select the access sequence MWST.
- Double click on Access.
- Click New entries.
- Enter access number 11, condition table 502, premise 7. Press Enter.
- Select line 502. Click the Fields menu item.
- Save.
- Maintaining a costing chart.
- Menu SPRO-Sales-Basic functions-Price calculation-Price calculation management-Define and assign costing schemes.
- Select the RVAARU circuit and click the Control menu item.
- For condition type Net Cost2, check print X, subtotal 3.
- For condition type MWR1,MWR4, check the print X, subtotal 5.
- After the condition type Total sum, check the empty line, check the print X, subtotal 4.
- Assignment of costing sheets for price calculation.
- Menu SPRO-Sales-Basic functions-Price calculation-Price calculation management-Define and assign costing schemes.
- Select the Define calculation scheme item.
- Enter new entries or copy standard ones.
- For sales org. ZUCH, distribution channel Z1, sector 01, document A, customer scheme 1, enter the calculation scheme RVAARU, condition type PR00.
- Save.
- Create condition records for pricing calculations.
- Menu S000-Logistics-Sales-Master Data-Conditions-Create.
- Transaction VK11.
- Enter condition type MW01, press Enter.
- Select menu item Z_Internal taxes.
- Enter customer tax classification 1, material tax classification 1, Amount 18%, per 1 unit, VAT code BC.
- Enter the customer's tax classification 0, material tax classification 0, Amount 0%, for 1 unit, VAT code BA.
- Save.
- Assignment of account codes.
- Menu: SPRO-Sales-Basic functions-Account assignment/costing-Selection of revenue accounts-Definition and assignment of account codes.
- Select the menu item Assign an account code.
- The standard defines the RVAA01 and RVAARU schemes. They are assigned condition types and account codes.
- Non-standard diagrams (RVAAR1) must be created or copied.
- Assignment of G/L accounts for invoices.
- Menu: SPRO-Sales-Basic functions-Account assignment/costing-Selection of revenue accounts-Assignment of main accounts.
- Double click on Table 001.
- Click New entries.
- Enter Appendix V Sales, condition type KOFI, chart of accounts CARU, sales organization ZUCH, customer account assignment group 01, material account assignment group 01, account code ERL, revenue account 90100000.
- Enter entries for all material and customer account assignment types.
- Enter entries for tables 002, 003, 004, 005.
- Save.
Setting up pricing calculations - non-standard
- Definition of condition tables.
- Menu SPRO-Sales-Main functions-Price calculation-Management of price calculation-Define condition tables.
- Definition of types of conditions.
- Menu SPRO-Sales-Main functions-Price calculation-Management of price calculation-Define condition types.
- The standard configures the access sequence MWST Output Tax with the access sequence MWST.
- Define access sequences for calculating prices.
- Menu SPRO-Sales-Basic functions-Price calculation-Price calculation management-Define access sequences.
- Copying the standard calculation scheme RVAA01 and adapting it for the s-f journal.
- Menu SPRO-Sales-Basic functions-Price calculation-Price calculation management-Define and assign costing schemes.
- Select Maintain costing chart.
- Select the RVAA01 circuit and click Copy.
- Enter the new scheme RVAAR1 and name.
- Save.
- Select the RVAAR1 circuit and click the Control menu item.
- Replace the stamp everywhere from S to X.
- For the condition type Net Cost2, enter stamp X, subtotal 3.
- For condition type MWST, enter stamp X, subtotal 5.
- After the condition type Final amount, create an empty line, enter stamp X, subtotal 4.
- Thus, subtotal VAT amounts will be copied to fields VBAP-KZWI5, VBRP-KZWI5. This is necessary to transfer the VAT amount to the s-f journal. See - Customizing printing of tax invoices in SD

- Assignment of costing sheets for price calculation.
- Menu SPRO-Sales-Basic functions-Price calculation-Price calculation management-Define and assign costing schemes.
- Select the Define calculation scheme item.
- Enter new entries or copy standard ones.
- For sales org. ZUCH, distribution channel Z1, sector 01, document A, customer scheme 1, enter costing scheme RVAAR1, condition type PR00.
- Save.
- Create condition records for pricing calculations.
- Menu S000-Logistics-Sales-Master Data-Conditions-Create.
- Transaction VK31.
- Select Taxes.
- Double click on MWST.
- For the line "VUsl Strn NlKln NlMt1" click the Create button.
- Enter condition type MWST, customer tax classification 1, material tax classification 1, Amount 18%, for 1 unit, VAT code BC.
- Enter condition type MWST, customer tax classification 0, material tax classification 0, Amount 0%, for 1 unit, VAT code BA.
- Save.
- Assignment of account codes.
- Menu: SPRO-Sales-Basic functions-Account assignment/costing-Selection of revenue accounts-Definition and assignment of account codes.
- Select the menu item Assign an account code.
- The standard defines the RVAA01 and RVAARU schemes. They are assigned condition types and account codes.
- Non-standard diagrams (RVAAR1) must be created or copied.
- Assignment of G/L accounts for invoices.
- Menu: SPRO-Sales-Basic functions-Account assignment/costing-Selection of revenue accounts-Assignment of main accounts.
- Double click on Table 001.
- Click New entries.
- Enter Appendix V Sales, condition type KOFI, chart of accounts CARU, sales organization ZUCH, customer account assignment group 01, material account assignment group 01, account code ERL, revenue account 90100000.
- Enter entries for all material and customer account assignment types.
- Enter entries for tables 002, 003, 004, 005.
- Save.
Setting up operational logistics
- Assignment of shipping points.
- Menu: SPRO-Executive logistics-Shipment-Basics-Define shipping point/receiving point-Assignment of shipping points.
- Click new entries.
- Enter Shipping Condition, Loading Group, Plant, Default Shipping Point, Manual Shipping Point.
- Save.
Setting up output documents for deliveries
The settings are located in the menu:
SPRO-Executive Logistics-Shipping-Basics-Output Management-Output Selection-Maintaining Output Selection for Outbound Deliveries.
- Maintaining types of output documents.
- Select the type of output document LD00 Invoice. Double tap.
- Check the access sequence 0005 sales.org / client.
- Select Processing routines.
- Enter data: Tool - Printing, program J_3RV_DELIV_PDF, subroutine ENTRY, PDF/smartform J_3RV_T12_PDF.
- Enter data: Tool - Telefax, program RLE_DELNOTE, subroutine ENTRY, PDF/smartform LE_SHP_DELNOTE.
- Enter data: Tool - Telex, program J_3RV_DELIV_PDF, subroutine ENTRY, PDF/smartform J_3RV_T12_PDF.
- Enter data: Tool - External sending, program J_3RV_TORG12_BIL, subroutine ENTRY, PDF/smartform J_3RV_T12_PDF.
- Enter data: Tool - Special function, program J_3RV_DELIV_PDF, subroutine ENTRY, PDF/smartform empty.
- Save.
- To enter entries into the “Journal of invoices and acts”, use the Special function without specifying a form.
- Select Partner Roles.
- Click New entries.
- Enter data: Tool Printing, Role WE Recipient of material.
- Enter data: Tool Telefax, Role WE Recipient of the material.
- Enter data: Tool Special function, Role WE Recipient of material.
- Save.
- Maintaining a diagram of the conditions of the output document.
- Select V10000 Shipping output documents.
- Select the menu item Management.
- Check that there is a line with the condition type LD00 Invoice.
- Save.
- Assignment of the output document condition scheme.
- Select the menu item Assignment of deliveries (header).
- Select line LF Outbound delivery.
- Check that the V10000 circuit and the type of output doc are assigned. LD00.
- Save.
Setting up output documents for invoices
- SPRO-Sales-Basic functions-Managing output documents-Selecting output documents-Selecting output documents using the condition technique-Maintaining the selection of output documents for invoices.
- Maintaining types of output documents for sales.
- Select entry RD00.
- Click New entries.
- Enter data: Printing tool, program J_3RV_INV_A, subroutine ENTRY, pdf/smartform J_3RVINVOICE.
- Enter data: Telex tool, program J_3RV_INV_A, subroutine ENTRY, pdf/smartform J_3RVINVOICE.
- Enter data: External sending tool, program J_3RV_TORG12_BIL, subroutine ENTRY, pdf/smartform J_3RV_T12_PDF.
- Enter data: Special function tool, J_3RV_INV_A program, ENTRY subroutine, pdf/smartform is empty.
- To enter entries into the “Invoice Journal”, use the Special function without specifying a form.
- Save.
- Click New entries.
- Save.
- Maintaining types of output documents for adjustment accounts.
- Select RD00, click the copy button.
- Enter the new code RUCR-adjustment accounts and save.
- Click the Processing subroutines menu item.
- Click New entries.
- Enter data: Printing tool, program J_3RV_CORRINV_A, subroutine ENTRY, pdf/smartform J_3RCORRINV.
- Enter data: Telefax tool, RLB_INVOICE program, ENTRY subroutine, pdf/smartform LB_BIL_INVOICE.
- Enter data: EDI tool, RSNASTED program, EDI_PROCESSING subroutine, pdf/smartform is empty.
- Enter data: Special function tool, J_3RV_CORRINV_A program, ENTRY subroutine, pdf/smartform is empty.
- Enter data: ALE Distribution tool, RSNASTED program, ALE_PROCESSING subroutine, pdf/smartform is empty.
- Save.
- Click the Partner Roles menu item.
- Click New entries.
- Enter data: Print tool, PS role - invoice recipient.
- Enter data: Telefax tool, PS role - invoice recipient.
- Enter data: EDI tool, role of PS invoice recipient.
- Enter data: Special function tool, PS role - invoice recipient.
- Enter data: DistributionALE tool, PS role invoice recipient.
- Save.
- Maintaining a diagram of the conditions of the output document
- Select V10000, click the Control menu item.
- Check line: level 10, counter 0, ViewUsl RD00, premise 62.
- Click New entries.
- Enter Level 11, counter 1, condition type RDRU.
- Click New entries.
- Enter Level 400, counter 0, condition type RUCR.
- Save.
- Define print settings.
- Menu SPRO-Sales-Basic functions-Manage output documents-Define printing parameters.
- Select Invoicing-Invoice(RD00).
- Click New entries.
- Enter sales organization ZUCH, device. output LP01, name LIST1S, suffix1 LT01, suffix2 RCHNUNG.
- Save.
- Select Invoicing-Invoice (RDRU).
- Click New entries.
- Enter sales organization ZUCH, device. output LP01, name LIST1S, suffix1 RDRU.
- Save.
- Select the item Invoicing-Corr.s-f (RUCR).
- Click New entries.
- Enter sales organization ZUCH, device. output LP01, name LIST1S, suffix1 RUCR.
- Save.
- Creating a condition for the output document.
- Menu S000-Sales-Master Data-Output Documents-Invoice-Create (VV31).
- Enter the output document type RD00 Invoice.
- The key combination will be adjusted automatically from the output document settings in SPRO.
- Enter company code, customer, partner role, sender 1 print, output time 4 when saving.
- When saving s-f, if the condition is triggered, an output document is created.
IDOC/EDI setup
Settings for IDOC/EDI are located in the menu:
S000-Logistics-Material Management flows-Foreign trade/duties-Communication/printing-Communication/printing-Environment-IDOC/EDI basis-Administration
- Definition of IDOC partner data.
- Menu: S000-Logistics-Material Management. flows-Foreign trade/duties-Communication/printing-Communication/printing-Environment-IDOC/EDI basis-Administration-Define partner data.
- Enter transaction (WE20).
- Click the Create button.
- Specify partner number 1 (creditor number 1 must exist), partner type LI-creditor, processor type US-tab.number, processor ADMIN.
- Save.
EDI setup
Settings for EDI are located in the menu:
SPRO-Finance-Accounting Receivables and Creditors-Business Transactions-Invoice/Credit Memo Receipt-EDI
Contains the following items:
- Entering program parameters for incoming invoices via EDI
- Assigning a Company Code to Incoming EDI Invoices
- Assigning G/L Accounts to the EDI Procedure
- Assigning a VAT code to the EDI procedure
- Assigning additional account assignments to the EDI procedure
- Development of extensions for incoming invoices via EDI (FEDI0001)
- Entering program parameters for incoming invoices via EDI.
- Enter the type of partner, for example LI-creditor, partner number, for example 1, BU.
- Check the box Prev. document registration.
- Specify the general ledger transaction codes, document type FI, for example KR, document type for debt reduction, for example KA, standard unit, for example ШТ.
- Save.
- Assigning a company code to incoming EDI invoices.
- Enter into transit. and click the New Entries button.
- Enter the partner type, for example LI, partner number, for example 1, company name, for example Paradigm, company code, for example ZUCH.
- Save.
- Assignment of G/L accounts to the EDI procedure.
- Enter the partner type, for example LI, partner number, for example 1, company account, for example ZUCH.
- Click the New records button.
- Enter the product number, name, main account, company account.
- Save.
- Assigning a VAT code to the EDI procedure.
- Enter into transit. and click the New Entries button.
- Enter the type of partner, partner number, three-digit tax code, tax rate, country, VAT code.
- Save.
Below is a list of transactions that can help your SAP FI consultant work.
| AB08 | Reversal Dept. Items Fixed Assets |
| ABAP_DOCU_SHOW | Calling the doc by key. according to ABAP |
| ABAPDOCU | Viewing ABAP Documentation |
| ABAPHELP | Search ABAP documentation |
| AL08 | List of all users in the system |
| BMBC | Batch Data Control Panel |
| BMBC | Batch Information Cockpit |
| CKM3 | Material price analysis |
| CO09 | Overview of available stocks |
| CODE_SCANNER | ABAP search |
| DMEE | DMEE: instr. maintaining format. tree |
| F.01 | ABAP/4 report: balance sheet |
| F.05 | Foreign currency valuation |
| F.07 | |
| F.13 | Auto. alignment without specifying currency |
| F.19 | General ledger: recalculation of PM/PS |
| F.80 | Mass reversal of documents |
| F-03 | PSD leveling |
| F-05 | Posting a foreign currency valuation |
| F110 | Parameters for automatic payment |
| F110 | Parameters for automatic payment (you can delete No.\n) |
| F13E | Auto. alignment with currency |
| F-28 | Posting Payment Input |
| F-32 | Clearing the customer account |
| F-44 | Vendor account clearing |
| F-47 | Advance payment requirement |
| F-53 | Posting OutcomePayment |
| F-60 | Table Maintenance: Posting Periods (Account Closing Check) |
| F-60 | Table maintenance: posting periods |
| FAGL_FC_VAL | Foreign currency valuation (new) |
| FAGL_FC_VAL | Foreign currency valuation |
| FAGLB03 | View balance (new) |
| FAGLB03 | View balance |
| FAGLCOFITRACEADMIN | Route management. Through Prov. online |
| FAGLGVTR | General ledger: balance carryover |
| FAGLL03 | Dept. G/L account items (new) |
| FB00 | Processing options for accounting |
| FB01 | Posting a document |
| FB03 | View a document |
| FB05 | Wiring with alignment |
| FB08 | Reversal Document |
| FB08 | Cancel document |
| FB60 | Entering incoming invoices |
| FB65 | Entering incoming credit memos |
| FB70 | Entering outgoing invoices |
| FB75 | Entering outgoing credit memos |
| FBB1 | Posting a foreign currency valuation |
| FBCJ | Cash entry |
| FBKP | Accounting/configuration (definition of OGK code) |
| FBL1N | List of individual creditor items |
| FBL3N | List of individual items main. accounts |
| FBL5N | List of individual debtor items |
| FBN2 | Maintain number range: FI_PYORD |
| FBPM | Payment media program PMW |
| FBR2 | Posting a document (according to sample) |
| FBRA | Cancel alignment |
| FBV2 | Changing a pre-registration document |
| FBZP | Configuration: maintaining ProgPlat |
| FD01 | Customer entry (accounting) |
| FD02 | Change of debtor (accounting) |
| FD03 | View customer (accounting) |
| FD32 | Change CreditManagement/Debtor |
| FDI1 | Create a report |
| FDI4 | Creating a Form |
| FDTA | TemSe/REGUT data management |
| FEBA_BANK_STATEMENT | Post-processing of account statements |
| FEBAN | Add. processing of account statements |
| FF_5 | Entering an electronic account statement |
| FF67 | Manual account statement |
| FF7A | Daily financial summary |
| FF7B | Liquidity forecast |
| FI02 | Change bank |
| FI03 | View bank |
| FIBF | BTE maintenance transaction |
| FK01 | Creditor entry (accounting) |
| FK02 | Change creditor (accounting) |
| FK03 | View creditor (accounting) |
| FM_SETS_FICTR1 | PFM Group. Create |
| FM_SETS_FICTR2 | PFM Group. Change |
| FM_SETS_FICTR3 | PFM Group. View |
| FMBB | Instr. budgeting tools |
| FMCIA | Edit financial position |
| FMCIA | Separate processing |
| FMCIC | View financial position |
| FMCID | Changing the default hierarchy |
| FMCIE | View hierarchy |
| FMCIH | Change alternate hierarchy |
| FMDERIVE | DB assignment of objects - setting |
| FMDERIVER | Edit Account Assignment Derivation |
| FMDOCREV | Mass reversal of UX documents |
| FMEDD | View input document |
| FMEDDW | Expand budget entry documents |
| FMSA | Create a Pension Fund in the EMF |
| FMSB | Change PFM in EMF |
| FMSC | Viewing the FMF in the EMF |
| FMSD | Edit the PFM hierarchy variant |
| FMSE | View the FFM hierarchy option |
| FS00 | Maintaining master data accounts |
| FS10N | View balance |
| FSP0 | G/L accounts in the chart of accounts |
| FTXP | Maintaining tax codes |
| GCU4 | Entering data from MM retroactively |
| GD23 | FI-SL: viewing LocalFactDocuments |
| GGB1 | Handling Replacements |
| GRR3 | RW: View form |
| GS01 | Create a set |
| GS02 | Changing the set |
| GS03 | View set |
| J3RCALD | Machine. aligned FI-AR (Russia) |
| J3RCALK | Machine. aligned FI-AP (Russia) |
| J3RCREV | Align the reversal. positions (Russia) |
| KAH1 | Create a Cost Element Group |
| KAH2 | Changing a Cost Element Group |
| KAH3 | Viewing a Cost Element Group |
| KB11N | Manual transfer of costs - input |
| KB13N | Manual cost transfer - view |
| KE24 | View Department Positions - Fact |
| KE30 | Run report/results |
| KE31 | Generating a results report |
| KE35 | Changing the form |
| KEI2 | Maintaining a results recording scheme |
| KP04 | Set ProfilePlanir |
| KP06 | |
| KPF6 | ChangePlanning ViewConsumption/ConsumptionRabt |
| KS01 | Creating a cost center |
| KS02 | Change of cost center |
| KS03 | View cost centers |
| KSB5 | CO documents Fact |
| LSMW | Legacy System Migration Workbench |
| MB03 | Goods receipt -> View material document |
| MB51 | List of material documents |
| MB51 | Goods receipt -> List of material documents |
| MB52 | Inventory list |
| MB5B | Inventory at posting date |
| M.B.B.S. | Reports -> View Valuated Special Stock |
| MC94 | Planning -> Change flexible ISL planning |
| MD04 | View stock/requirement status |
| ME21N | Create a purchase order |
| ME22N | Purchase order -> Change purchase order |
| ME23N | Purchase Order -> View Purchase Order |
| ME2L | Orders - Supplier |
| ME54N | Purchase order -> Requisition -> Release requisition |
| ME55 | Group release of requisitions |
| ME5A | Viewing the list of applications |
| MIGO | Material movement |
| MIGO | Goods receipt -> Goods movement |
| MIR5 | |
| MIR5 | Invoice receipt -> View list of invoice documents |
| MIR6 | Invoice receipt -> Invoice overview |
| MIRO | Entering an incoming invoice |
| MM60 | Materials catalog |
| MR51 | Material: individual items |
| MR8M | Reversal of invoice document (purchase) |
| OB_GLACC12 | HP basic accounts: mass. leading -2 |
| OB28 | C FI Table maintenance T001D |
| OB52 | C FI Table maintenance T001B |
| OB53 | C FI Table maintenance T030 bil+bil |
| OB74 | C FI Table maintenance TF123 AutoAlign |
| OBA3 | C FI Table maintenance T043G |
| OBBH | C FI table maintenance T001Q (Document) |
| OBD4 | C FI Table maintenance T077S |
| OBPM4 | Options for choosing payment media |
| OBY6 | C FI Table maintenance T001 |
| OBYC | C FI Table T030 rmk + space |
| OKB9 | Changing AutomaticAssignedAssignments |
| ORFA | Setting up Fixed Asset Accounting |
| OSS1 | Login SAP Service Marketplace |
| PFCG | Maintaining roles |
| S_ALR_87012168 | OP: analysis of payment terms |
| S_BCE_68001425 | Roles based on complex criteria |
| S_BCE_68001426 | Transactions for users. with prof. |
| S_PL0_09000467 | DME Engine: InputFile Format Conversion |
| S_PL0_86000028 | |
| S_PL0_86000028 | General -> Fact/fact comparisons -> Balance/P+U/Fact/fact comparison |
| SA38 | ABAP reports |
| SAT | ABAP Trace |
| SCMP | Comparison of views/tables |
| SCU3 | Table history |
| SE01 | Transfer organizer (extended view) |
| SE09 | Tool Organizer |
| SE11 | ABAP Dictionary: Maintaining |
| SE15 | ABAP Dictionary Information System |
| SE16 | Data Browser |
| SE16N | General table view |
| SE16N | T001B |
| SE17 | General table view |
| SE18 | BAdI-Builder - definitions |
| SE19 | BAdI-Builder - implementations |
| SE24 | Class Builder |
| SE37 | ABAP function modules |
| SE38 | ABAP editor (running programs) |
| SE38 | ABAP editor J_3RFDSLD OSV (debtors) |
| SE38 | ABAP editor J_3RF_SELL_BOOK_02 Sales book |
| SE38 | ABAP editor RFEBKA96 - deleting an extract |
| SE51 | Screen editor |
| SE80 | Object navigator |
| SE84 | Repository information system |
| SE91 | Maintaining messages |
| SE93 | Maintaining transaction codes |
| SFP | Form Builder |
| SHDB | Transaction Recorder (Batch Input) |
| SLG0 | Application Log: Object Maintenance |
| SLG1 | Application log: view magazines |
| SM01 | Blocking transactions |
| SM02 | System messages |
| SM04 | a list of users |
| SM12 | View and remove locks |
| SM13 | Administering Update Entries |
| SM20N | Contra analysis security log - Transaction usage log |
| SM20N | Contra analysis security log |
| SM21 | Online system log analysis |
| SM30 | Calling up view maintenance |
| SM34 | Calling view cluster maintenance |
| SM35 | Batch input monitoring |
| SM36 | Background request |
| SM37 | Job selection overview |
| SM50 | Workflow overview |
| SM51 | List of SAP systems |
| SM58 | Error log: async. RFC |
| SM59 | RFC addresses (view and maintain) |
| SM66 | Systemwide Work Process Overview |
| SMQ2 | qRFC monitor (login queue) |
| SP01 | Output Control |
| SPRO | Settings - project processing |
| SQVI | QuickViewer |
| ST05 | Performance Tracing |
| ST22 | ABAP dump analysis |
| STAUTHTRACE | Authority Tracing |
| STBRG_GRP | General maintenance of authorization groups |
| STMS | Transfer Management System |
| SU01 | User management |
| SU53 | Authorization check analysis |
| SUIM | User Information system |
| SWO2 | RBO Browser |
| V/LD | Execute a list of conditions |
| VA01 | Create a sales order |
| VA02 | Changing a sales order |
| VA03 | View a sales order |
| VARD | View a report variant |
| VF11 | Invoice reversal (sales invoice) |
| VFX3 | List of blocked invoices |
| VK11 | Create condition |
| VK12 | Change condition |
| VK13 | View condition |
| VL02N | Changing an Outbound Delivery |
| VL03N | View outgoing delivery |
| VL31N | Creating an inbound delivery |
| VL32N | Inbound Delivery -> Change Inbound Delivery |
| VL33N | Inbound Delivery -> View Inbound Delivery |
| VT01N | Creation of transportation |
| VT02N | Change of transportation |
| VT03N | View transportation |
| VT11 | Transportation selection: planning |
| XD02 | Change of customer (central) |
| XD03 | View customer (central) |
| XD07 | Changing the debtor's GroupAccounts |
| XK02 | ChangeCredit (central) |
| XK07 | Changing a vendor account group |
IN China You can create a red reversal. Red reversal allows you to reduce the turnover data of accounts posted in the General Ledger. Thus, posting a debit as a red reversal does not lead to an increase in these debit turnovers; it leads to a decrease in these loan turnovers. This allows you to view the turnover data for accounts after an incorrect posting and subsequent correction (for example, invoice posting and reversal), as if there was neither an incorrect posting nor correction.
Possibilities
The following table provides an overview of the consequences of a red reversal for the most important business transactions:
Business transaction |
Result |
Reversal |
For reversal, the document type used determines: Is red reversal prohibited? Is red reversal always allowed? A red reversal is created if the posting and reversal are carried out in the same fiscal year The main feature is that items in a reversal document for which the posting account has been changed compared to the original document do not participate in the red reversal. This is possible for aperiodic reversal processes (exchange of profit and loss accounts) or for posting incoming payments where the reversal is used to post back to a suspense account. |
Cancel alignment |
After clearing is cancelled, all accounts are displayed as if there was no clearing. This means that for the reverse posting of cash discounts, small differences, exchange rate differences, as well as taxes that were posted as a result of clearing, a red reversal must be carried out. The data displayed in accounts receivable accounts remains unaffected. You can cancel clearing for received payments. After clearing is cancelled, the payment with the clearing of open items becomes the payment balance again, i.e. the loan payment becomes an open item in the accounts receivable account. It makes no difference to the balance of the accounts receivable account whether the items have been cleared or whether there is a payment balance. |
Returns |
Returns should be treated as reversals. The first position of the return posting, i.e. the posting to the return clearing account, is never included in the red reversal. This also applies to return fees. |
Manual posting |
To post a document for which red reversals must be made manually for all positions, it is enough to select the appropriate document type. However, to perform a red reversal for line items, you must enter the entire transaction in two documents. Transfers a transaction from an incorrect G/L account to the correct G/L account. Resetting an incorrect G/L account requires a red reversal, as opposed to posting to the correct account. First you must enter the red reversal: Posting the clearing account to the wrong G/L account. Then the "standard" posting: Posting the correct G/L account to the clearing account. |
Remaining payment |
If, upon receipt of a payment, instead of clearing, the payment balance is posted first (for example, through bookkeeping or during processing of a subsequent payment), the debits and credits of the accounts receivable account are increased by the amount of the payment balance. To avoid this, you should create red reversals for each account posting clearing. To do this, you must specify in Customizing for the main and subtransaction used for payment balances that a red reversal is to be used for each clearing of this item. |
Revenue distribution |
In contrast to normal distribution entries, red reversals are used for adjustment entries that arise, for example, as a result of clearing cancellations or payment reversals. The prerequisite for this is that the red reversal is allowed at company code level and it supports the document type used for revenue distribution (posting area 1381). |
Operations
Determine whether red reversal should be allowed at company code level. For Contract settlements the corresponding parameter in the company code table is also used . To select a company code (with red reversal capability), refer to the Implementation Guide for the component Finance and select Global Finance Settings ® Company code ® Checking and expanding global parameters .
Besides, in China The possibility of performing a red reversal determines the type of document. You can select a document type in which red reversals will always be created or only for adjustments made in the same financial year. To select the document type, see the Implementation Guide for the component. Contract settlements and select Main functions ® Postings and documents ® Document ® Maintain document account assignments ® Types of documents ® Maintaining document types and assigning number ranges. For more information about selecting a document type, please refer to the documentation for the field Red reversal.
The main and subtransactions that you want to define for negative clearing (for example: payment balances) can be found in the Implementation Guide for the component China by selecting the path from the menu Main functions ® Postings and documents ® Document ® Maintain document account assignments ® Conducting partial operations.