
What is a strip foundation? DIY strip foundation: stages of work and step-by-step instructions. Shallow strip foundation for a house
Most often with self-erection country house, baths, garage or country house, tape-type foundations are used as the base. The thing is that the construction of the strip foundation is easy to do with your own hands due to the simplicity and availability of technology. In addition, it is a versatile solution suitable for use on any type of soil and with any material of the walls of the house, as well as a very affordable construction. Before making such a foundation, it is necessary to decide whether it will be shallow or buried, as well as to choose the right materials and think over the future structure. Installation instructions, photos and videos from our article will help you figure out the process and equip a strip foundation for your home.
Selecting the type of foundation
All tape-type foundations can be divided into shallow and buried, monolithic and prefabricated:
- If the house will be made of light material - wood or foam blocks, then you can equip shallow base
... This option is suitable for frame buildings, as well as brick buildings with a small thickness of outer walls and small dimensions (sheds, outbuildings). They can be done on slightly loose soil. The height of such a tape is no more than 50-70 cm. - Recessed foundation
suitable for a house with massive heavy load-bearing walls made of brick, stone or concrete. It can be erected on any type of soil, as well as for a house with a basement. The depth of laying such a foundation depends on the level of freezing of the soil - the structure should be 200-300 mm lower than this mark. - Monolithic structures
represent a continuous strip of monolithic reinforced concrete. The structure is manufactured using formwork and cast directly at the construction site. This option is suitable for slightly loose and heaving soils... To make such a foundation, you do not need any lifting equipment. Everything can be done manually, so this option is more suitable for self-production. The execution technology can be studied in detail in the video instructions at the end of the article. - Prefabricated bases
slightly inferior in strength to monolithic structures, but they are assembled faster due to the use of factory foundation cushions and concrete blocks. However, in order to build such a foundation, it is necessary to attract construction lifting equipment. In the photo below you can see the construction of the prefabricated base.
In our article, we will take a closer look at the technology for performing a monolithic tape-type foundation.
Monolithic strip base technology
Before you start making the base for the house, you need to examine the soil to establish its composition and height. groundwater... This will help you choose the right foundation structure, as well as determine the depth of its foundation. After completing the drawings and calculating the volume of materials, you can start performing work.
Site preparation and marking

The construction site must be cleared of debris and green spaces that will interfere with the construction. After that, you can start marking the foundation of the house on the site. This can be done with rope and pegs, or using a building level and theodolite.
To correctly make the layout of the future house, you must:
- First of all, a breakdown of the axes of the structure is carried out on the site.
- Further from the border of the site, the extreme corner of the structure is tied and a peg is hammered. A rope is pulled from it at a right angle to the next corner of the house.
- Then, with the help of a theodolite or square, the next corner of the building is found.
- After that, the angles are checked along the diagonals.
- If the test is positive, then all corner pegs are connected with a rope.
- Now you can start marking the inner edge of the foundation. To do this, from the stretched rope, you need to retreat inward a distance equal to the width of the future base.
After completing the markup, it is worth checking the elevation differences on the site. Then you need to find a low point and measure the depth of the foundation from it. This will eliminate differences in the height of the structure.
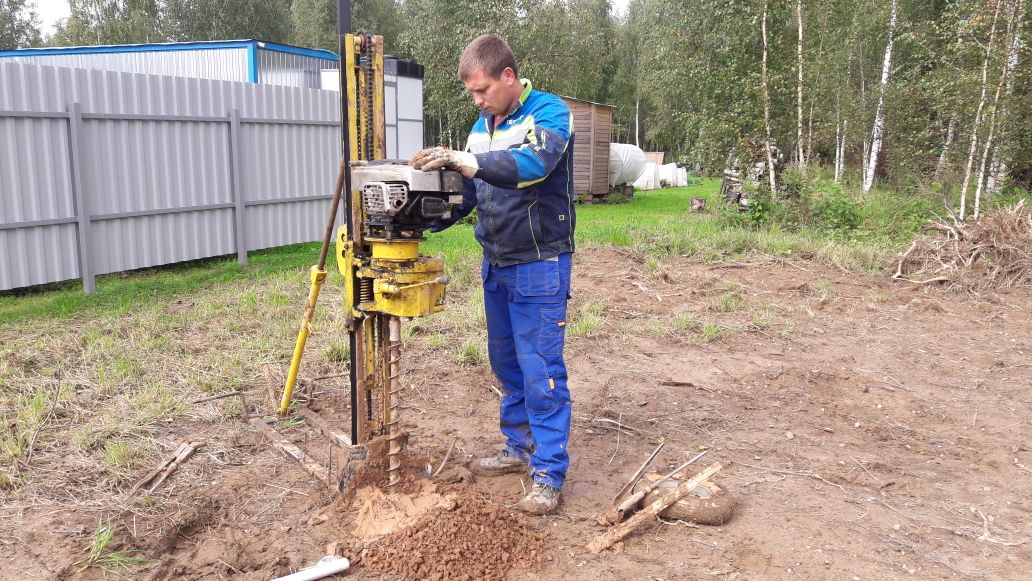
Now you can start digging a trench or foundation pit. The work can be carried out manually with a shovel or using construction equipment. In any case, the final alignment of the walls and bottom of the trench is done manually using a shovel. To make the depth of the trench the same, use a building water level.
Arrangement of a pillow

After completing the trench, they begin to prepare the base for pouring the foundation:
- After laying, the sand is spilled with water and carefully rammed.
- It is sometimes advisable to waterproof the sand bed, although this is not necessary. For insulation, you can use a strong film or make an interlayer of M 150 concrete with a height of 100 mm. Such a concrete layer will increase the strength of the base, protect it from shrinkage and cracking. It is especially recommended to carry out such a foundation on sandy and sandy loam soils, as well as with a high standing of groundwater.
Important: do not use geotextiles as insulation. This material can counter the effect and reduce bearing capacity grounds.
Formwork device

A week later, when the concrete solution has set, you can start making the formwork from planed boards with a thickness of 40-50 mm. Instead of boards, you can take moisture resistant plywood or OSB. When erecting the formwork, it is necessary to strictly control its verticality.
Above the surface of the ground, the formwork should rise to the height of the basement according to the design of the house. Before pouring concrete, the inner surface of the formwork can be covered with plastic wrap. This will reduce the adhesion of the concrete to the timber elements and facilitate the removal of the formwork. In addition, the boards protected from contamination can be reused.
Attention: when arranging the formwork, it is necessary to provide a hole for the asbestos-cement pipe, which will serve as a sleeve for passing through the foundation of engineering networks into the house.
The formwork can be removed after the concrete has gained its initial strength. This usually happens after a week.
Reinforcement tab

After assembling the formwork, you can start making the reinforcement cage. Usually, for a residential building with a height of no more than 2-3 floors, it is enough to make a frame from AIII reinforcement with a section of 10-12 mm. In this case, a thicker bar is used as the longitudinal guides of the frame, and transverse bars made of reinforcement with a diameter of 10 mm are laid with a step of 200 mm.
Important: it is better to make a spatial frame, that is, to connect two flat reinforcing meshes with vertical rods. Their height depends on the construction of the base.
To protect the reinforcement cage from corrosion, it must be buried at least 5 cm into the concrete. Take this into account when calculating the width of the cage, as well as when laying it on the bottom of a formwork trench. Spacers can be placed underneath to provide the required distance from the edge of the concrete.
Communications and ventilation

Before pouring concrete mix it is necessary to make structures that will allow to ventilate the space under the house, if a basement is not provided, and also to bring engineering communications into the house - water supply networks and sewerage systems.
For this, it is better to use plastic or asbestos-cement pipes, which are laid in the reinforcing cage between the walls of the formwork and tied with a wire to the reinforcement. To prevent mortar from getting into the pipes during the pouring of concrete, pour sand into them.
When laying a sleeve for entering engineering networks, it is worth considering the mark of freezing of the soil, because the input is performed below it. Thus, when arranging a shallow foundation, the input will be located below the entire structure, and when installing a buried base, the sleeve should be laid 200 mm above the bottom of the foundation.
Pouring with concrete

Concrete pouring should be done by adhering to the following recommendations:
- As you can see in the video below, filling is done in layers 150-200 mm high. After pouring each layer, the concrete is rammed with a manual rammer or a special deep vibrator. This will eliminate air bubbles and increase structural strength.
- For pouring, you can use prefabricated concrete, as in the proposed video, or prepare the mixture yourself. For this, cement, sand and crushed stone are mixed in a 1-3-5 ratio.
- To avoid delamination of concrete, do not pour mortar from a height of more than 150 cm. Otherwise, the final strength of the structure will decrease.
- When performing work in the winter, frost-resistant additives to concrete, for example, table salt or calcium chloride, must be used.
After finishing filling concrete foundation covered with plastic wrap for uniform evaporation of moisture and protection from precipitation. The film can be removed after 4-5 days. Concrete gains initial strength after 14 days, and full hardening occurs after 28 days.
Important: in the heat, the concrete must be moistened with water at first in order to protect it from rapid evaporation of moisture and cracking.
Waterproofing

After the concrete has set and the formwork has been removed, the walls must be waterproofed. For this, you can use bitumen or bitumen mastic. The composition used is applied in two layers to the outer walls of the foundation.
For the foundations of houses with basements, which are built in conditions of a high level of groundwater, in addition to coating waterproofing, it is worth using the coating of the outer surfaces of the foundation with roofing material. It is especially necessary to seal the place where utility lines enter the house. If your house does not have a basement and the height of the groundwater is low, then you can refuse vertical waterproofing of the base.
Warming

Insulation of the foundation can be done according to one of three methods:
- Expanded clay can be used to backfill the space around the foundation in the trench. However, the backfill should be made at least 50-100 cm wide. With a smaller backfill thickness, the insulation efficiency will be insufficient. However, this is not a very good method, since expanded clay can absorb moisture, from which its thermal insulation qualities will decrease.
- Effective insulation of the base is achieved using extruded polystyrene foam. In this case, slabs with a thickness of at least 50-100 mm are needed. it the best way insulation, which is also suitable for a house with a felling. Expanded polystyrene plates are attached to the basement of the house above the ground level, as well as to the foundation wall up to the freezing mark.
Tip: An efficient and economical solution would be to manufacture fixed formwork from expanded polystyrene. However, in this case, it is necessary to thoroughly fix the slabs from the outside so that they are not ripped apart by concrete.
- Insulation can also be performed by spraying polyurethane foam onto the walls of the base. However, the price of this method is rather big, because for this you will have to contact specialists. In addition, this material is quickly destroyed by ultraviolet radiation.
Completion of work

Backfilling of the trench can be done after completion of the work. To do this, it is better to use clay or sand, not previously removed soil. In this case, sand is poured in layers with water and rammed, and clay is simply rammed in layers.
To protect the foundation from destruction melt water and rains necessarily make a blind area with a slope from the house. Its width must be at least 1 m. Concrete or asphalt concrete can be used for it.
DIY monolithic strip foundation: step by step video instruction
Everyone knows the old adage that a real man must do three things in his life: plant a tree, raise a son and build a house. With the last point, especially many questions arise - what material is better to use, choose a one- or two-story building, how many rooms to count on, with or without a veranda, how to install the foundation and many others. Among all these aspects, it is the foundation that is fundamental, and this article will be devoted to its tape type, its features, differences, construction technology.


Peculiarities
Despite the fact that there are several types of foundations for a house, preference in modern construction is given to a strip foundation. Due to its durability, reliability and strength, it occupies a leading position in the construction industry around the world.
Already from the name it is clear that such a structure is a tape of a fixed width and height, laid in special trenches along the boundaries of the building under each of the outer walls, thus forming a closed loop.
This technology gives the foundation the ultimate rigidity and strength. And due to the use of reinforced concrete in the formation of the structure, maximum strength is achieved.


Among the key features of the strip type of foundation are the following:
- already mentioned above reliability and long service life;
- fast construction of the structure;
- general availability in terms of cost relative to its parameters;
- the ability to install manually without the use of heavy equipment.
According to the standards of GOST 13580-85, the strip foundation is a reinforced concrete slab, the length of which is from 78 cm to 298 cm, the width is from 60 cm to 320 cm and the height is from 30 cm to 50 cm. After the calculations, the base grade is determined with a load index of 1 up to 4, which is an indicator of the pressure of the walls on the foundation.


Compared to pile and slab types, the strip base, of course, wins. However, a columnar foundation overpowers the foundation with a tape due to the significant consumption of materials and an increase in labor intensity.
This figure is influenced by:
- soil characteristics;
- the total area of the basement floor;
- type and quality of building materials;
- depth;
- dimensions (height and width) of the tape itself.


The service life of the strip foundation directly depends on the correct choice of a site for construction, compliance with all requirements and building codes. Taking into account all the rules will extend the service life for more than one decade.
An important feature in this matter is the choice of building material:
- a brick foundation will last up to 50 years;
- prefabricated structure - up to 75 years;
- rubble and monolithic concrete in the manufacture of the base will increase the operational life up to 150 years.


The purpose
It is possible to use the belt technology for the construction of the foundation:
- in the construction of a monolithic, wooden, concrete, brick, frame structure;
- for a residential building, bathhouse, utility or industrial building;
- for the construction of fences;
- if the building is located on a site with a slope;
- great if you decide to build ground floor, veranda, garage or basement;
- for a house where the density of the walls is more than 1300 kg / m³;
- for both light and heavy buildings;
- in areas with heterogeneously bedded soil, which leads to uneven shrinkage of the base of the structure;
- on loamy, clayey and sandy soil.


Advantages and disadvantages


Among all the many advantages, it is worth mentioning some of the disadvantages of the strip foundation:
- for all the simplicity of the design, the work itself is quite laborious;
- difficulties with waterproofing when installed on wet ground;
- unsuitable for soils with weak bearing properties due to the large mass of the structure;
- reliability and strength is guaranteed only when reinforcing (reinforcing the concrete base with steel reinforcement).


Views
By classifying the selected type of foundation according to the type of device, it is possible to distinguish monolithic and prefabricated foundations.
Monolithic
The continuity of the underground walls is assumed. They are characterized by low construction costs in relation to strength. This type is in demand when building a bathhouse or a small wooden house. The disadvantage is the large weight of the monolithic structure.
The technology of a monolithic foundation involves a reinforcing metal frame, which is installed in a trench, after which it is poured with concrete. It is due to the frame that the necessary rigidity of the foundation and resistance to loads are acquired.
Cost for 1 sq. m - about 5100 rubles (with characteristics: slab - 300 mm (h), sand cushion - 500 mm, concrete grade - M300). On average, a contractor for pouring a 10x10 foundation will take about 300-350 thousand rubles, taking into account installation and the cost of materials.


Prefabricated
A prefabricated strip foundation differs from a monolithic one in that it consists of a complex of special reinforced concrete blocks interconnected by means of reinforcement and masonry mortar, which are mounted with a crane at the construction site. Among the main advantages is the reduction in installation time. The downside is the lack of a single design and the need to attract heavy equipment. In addition, in terms of strength, the prefabricated foundation is inferior to the monolithic one by as much as 20%.
Such a foundation is used in the construction of industrial or civil buildings, as well as for cottages and private houses.
The main costs will be spent on haulage and hourly rental of a truck crane. 1 running meter of a prefabricated foundation will cost at least 6,600 rubles. The base of the building with an area of 10x10 will have to spend about 330 thousand. Laying wall blocks and pillows with a short distance will allow you to save money.


There is also a strip-slotted subspecies of the structure, which in its parameters is similar to a monolithic strip foundation. However, this base is adapted for pouring exclusively on clay and non-porous soils. Such a foundation is cheaper due to the reduction of land work, since the installation takes place without formwork. Instead, a trench is used, which visually resembles a gap, hence the name. Slotted foundations allow you to equip a garage or utility room in low-rise, non-massive buildings.
Important! Concrete is poured into damp ground, since in a dry trench part of the moisture goes into the ground, which may deteriorate the quality of the foundation. Therefore, it is better to use concrete of a higher grade.


Another subspecies of the prefabricated strip foundation is cross. It includes glasses for columns, base and intermediate plates. Such foundations are in demand in a row building - when a columnar foundation is located in proximity to a foundation of the same type. This arrangement is fraught with subsidence of structures. The use of cross foundations involves the contact of the lattice of the final beams of the building under construction with an already built and stable structure, thereby allowing the load to be evenly distributed. This type of construction is applicable for both residential and industrial construction... Among the shortcomings, the laboriousness of the work is noted.
Also, for a strip type of foundation, a conditional division can be made with respect to the depth of the laying. In this connection, the buried and shallow buried species are distinguished by the magnitude of the load.
Deepening is carried out below the established level of soil freezing. However, within the limits of private low-rise buildings, a shallow foundation is acceptable.


The choice in this typing depends on:
- building mass;
- the presence of a basement;
- type of soil;
- indicators of the difference in height;
- groundwater level;
- the level of soil freezing.
Determination of the listed indicators will help in the correct choice of the type of strip foundation.


The in-depth view of the foundation is intended for a house made of foam blocks, heavy buildings made of stone, brick, or multi-storey buildings... For such foundations, significant differences in height are not terrible. Perfect for buildings in which it is planned to arrange a basement floor. It is erected 20 cm below the level of soil freezing (for Russia it is 1.1-2 m).
It is important to take into account the frost heaving buoyancy forces, which should be less than the concentrated load from the house. To confront these forces, the foundation is set in the shape of an inverted T.
The shallow tape is distinguished by the lightness of the buildings that will be located on it. In particular, these are wooden, frame or cellular structures. But it is undesirable to locate it on the ground with a high level of groundwater (up to 50-70 cm).
Key benefits shallow foundation is the low cost of building materials, ease of use and short installation time, in contrast to the buried base. In addition, if it is possible to get by with a small cellar in the house, then such a foundation is an excellent and low-cost option.


Among the disadvantages is the inadmissibility of installation in unstable soils., and under two-storey house such a foundation will not work.
Also, one of the features of this type of base is the small area of the lateral surface of the walls, and therefore the buoyant forces of frost heaving are not afraid of light construction.
To date, developers are actively introducing the Finnish technology for installing a foundation without deepening - pile-grillage. The grillage is a slab or beams that connect the piles to each other already above the ground. The new type of zero-level device does not require the installation of boards and the installation of wooden blocks. In addition, there is no need to dismantle the hardened concrete. It is believed that such a structure is not subject to heaving force at all and the foundation is not deformed. Installed on the formwork.


In accordance with the norms regulated by SNiP, the minimum depth of the strip foundation is calculated.
Materials (edit)
Strip foundation predominantly mounted from bricks, reinforced concrete, rubble concrete, using reinforced concrete blocks or slabs.
Brick is suitable if the house is supposed to be built with a frame or with thin brick walls. Since the brick material is very hygroscopic and easily destroyed due to moisture and cold, such a deep foundation is not welcome in places with a high level of groundwater. In this case, it is important to provide a waterproofing coating for such a base.
The popular reinforced concrete base, despite its low cost, is quite reliable and durable. The material contains cement, sand, crushed stone, which are reinforced with a metal mesh or reinforcement rods. Suitable for sandy soil when erecting monolithic foundations of complex configuration.


A strip foundation made of rubble concrete is a mixture of cement, sand and large stone. A fairly reliable material with length parameters - no more than 30 cm, width - from 20 to 100 cm and two parallel surfaces up to 30 kg. This option is perfect for sandy soils. Besides, a prerequisite for the construction of a concrete foundation, there must be a gravel or sand cushion 10 cm thick, which simplifies the process of laying the mixture and allows you to level the surface.
The foundation made of reinforced concrete blocks and slabs is a finished product manufactured at the enterprise. Among distinctive features- reliability, stability, strength, the ability to use for houses of various designs and types of soil.


The choice of material for the construction of a strip foundation depends on the type of device.
The base of the prefabricated type is made:
- from blocks or slabs of an established brand;
- concrete mortar or even brick is used to seal the cracks;
- completed with all materials for hydro and thermal insulation.


- the formwork is constructed from a wooden board or expanded polystyrene;
- concrete;
- material for hydro and thermal insulation;
- sand or crushed stone for the pillow.


Calculation and design rules
Before the project is drawn up and the parameters of the foundation of the building are determined, it is recommended to review the regulatory construction documents, which describe all the key rules for calculating the foundation and tables with established coefficients.
Among such documents:
GOST 25100-82 (95) “Soils. Classification";
GOST 27751-88 "Reliability building structures and grounds. Basic provisions for the calculation ";
GOST R 54257 "Reliability of building structures and foundations";
SP 131.13330.2012 "Construction climatology". Updated version of SN and P 23-01-99;
SNiP 11-02-96. " Engineering survey for construction. Basic Provisions ";
SNiP 2.02.01-83 "Foundations of buildings and structures";
Manual for SNiP 2.02.01-83 "Manual for the design of the foundations of buildings and structures";
SNiP 2.01.07-85 "Loads and Impacts";
Allowance for SNiP 2.03.01; 84. "Manual for the design of foundations on a natural foundation for the columns of buildings and structures";
SP 50-101-2004 "Design and construction of foundations and foundations of buildings and structures";
SNiP 3.02.01-87 "Earthworks, foundations and foundations";
SP 45.13330.2012 "Earthworks, foundations and foundations". (Updated edition of SNiP 3.02.01-87);
SNiP 2.02.04; 88 "Bases and foundations on permafrost."


Let's consider in detail and step by step the calculation plan for the construction of the foundation.
To begin with, a total calculation of the total weight of the structure is made, including the roof, walls and ceilings, the maximum permissible number of residents, heating equipment and household installations, and the load from precipitation.
You need to know that the weight of the house is determined not by the material from which the foundation is made, but by the load that is created by the entire structure from various materials. This load directly depends on the mechanical properties and the amount of material used.
To calculate the pressure on the sole of the base, it is enough to summarize the following indicators:


The first item is calculated by using the formula snow load = roof area (from the project) x set parameter of snow cover mass (different for each region of Russia) x correction factor (which is influenced by the angle of inclination of a single or gable roof).
The established parameter of the mass of snow cover is determined according to the zoned map SN and P 2.01.07-85 “Loads and Impacts”.
The next step is to calculate the potentially acceptable payload. This category includes household appliances, temporary and permanent residents, furniture and bathroom equipment, communication systems, stoves and fireplaces (if any), additional engineering routes.
Exists fixed form calculation of this parameter, calculated with a margin: payload parameters = total structure area x 180 kg / m².


In the calculations of the last point (the load of the parts of the building), it is important to list as much as possible all the elements of the building, including:
- directly the reinforced base itself;
- ground floor of the house;
- load-bearing part of the building, window and door openings, stairs, if any;
- floor and ceiling surfaces, basement and attic floors;
- roof covering with all the attendant elements;
- floor insulation, waterproofing, ventilation;
- surface finishing and decorative items;
- all the set of fasteners and hardware.
Moreover, to calculate the sum of all the above elements, two methods are used - mathematical and the results of a marketing calculation in the building materials market.
Of course, there is also the option of using a combination of both methods.


The plan for the first method is:
- breaking complex structures into parts in the project, determine the linear dimensions of the elements (length, width, height);
- multiply the obtained data to measure the volume;
- with the help of all-Union norms of technological design or in the documents of the manufacturer, establish the specific weight of the used building material;
- having established the parameters of the volume and specific gravity, calculate the mass of each of the building elements using the formula: mass of a part of the building = volume of this part x parameter of the specific gravity of the material from which it is made;
- calculate the total mass permissible under the foundation, summing up the results of the parts of the structure.
The method of marketing calculation is guided by data from the Internet, mass media and professional reviews. The indicated specific gravity is also added up.


The design and sales departments of enterprises have accurate data, where possible, by calling them, clarify the nomenclature or use the manufacturer's website.
The general parameter of the load on the foundation is determined by summing all the calculated values - the load of the parts of the structure, useful and snow.
approximate specific pressure = weight of the entire structure / dimensions of the foot area of the base.

Having determined these parameters, an approximate calculation of the geometric parameters of the strip foundation is permissible. This process occurs according to a certain algorithm established during the research by specialists from the scientific and engineering department. The calculation scheme for the size of the foundation depends not only on the expected load on it, but also on the construction documented norms for deepening the foundation, which, in turn, are determined by the type and structure of the soil, the level of groundwater, and the depth of freezing.
Based on the experience gained, the developer recommends the following parameters:
Soil type | Soil within the calculated freezing depth | The interval from the planned mark to the groundwater level during the freezing period | Foundation installation depth |
Non-porous | Coarse, gravelly sands, coarse and medium size | Not standardized | Any, regardless of the border of freezing, but not less than 0.5 meters |
Puffy | The sand is fine and silty | Exceeds the freezing depth of more than 2 m | The same indicator |
Exceeds the freezing depth by at least 2 m | Not less than ¾ of the calculated freezing level, but not less than 0.7 m. |
||
Loam, clay | Less estimated freezing depth | Not less than the calculated level of freezing |
The width parameter of the strip foundation should not be less than the width of the walls. The depth of the pit, which determines the base height parameter, should be designed for a 10-15 centimeter sand or gravel cushion. These indicators allow in further calculations to determine with: The minimum width of the base of the foundation is calculated depending on the pressure of the building on the foundation. This size, in turn, determines the width of the foundation itself, pressing on the soil.
That is why it is so important to make an examination of the soil before starting the design of the structure.
- the amount of concrete for pouring;
- volume of reinforcing elements;
- the amount of material for the formwork.


Rubble stone:
- basement depth - 2 m:
- basement wall length - up to 3 m: wall thickness - 600, basement base width - 800;
- basement wall length 3-4 m: wall thickness - 750, basement base width - 900.
- basement depth - 2.5m:
- basement wall length - up to 3 m: wall thickness - 600, basement base width - 900;
- basement wall length 3-4 m: wall thickness - 750, basement base width - 1050.


Rubble concrete:
- basement depth - 2 m:
- basement wall length - up to 3 m: wall thickness - 400, basement base width - 500;
- basement wall length - 3-4 m: wall thickness - 500, basement base width - 600.
- basement depth - 2.5m:
- basement wall length up to 3 m: wall thickness - 400, basement base width - 600;
- basement wall length 3-4 m: wall thickness - 500, basement base width - 800.


Clay brick (ordinary):
- basement depth - 2 m:
- basement wall length up to 3 m: wall thickness - 380, basement base width - 640;
- basement wall length 3-4 m: wall thickness - 510, basement base width - 770.
- basement depth - 2.5m:
- basement wall length up to 3 m: wall thickness - 380, basement base width - 770;
- basement wall length 3-4 m: wall thickness - 510, basement base width - 900.

Concrete (monolith):
- basement depth - 2 m:
- basement wall length up to 3 m: wall thickness - 200, basement base width - 300;
- basement wall length 3-4 m: wall thickness - 250, basement base width - 400.
- basement depth - 2.5m;
- basement wall length up to 3 m: wall thickness - 200, basement base width - 400;
- basement wall length 3-4 m: wall thickness - 250, basement base width - 500.


Concrete (blocks):
- basement depth - 2 m:
- basement wall length up to 3 m: wall thickness - 250, basement base width - 400;
- basement wall length 3-4 m: wall thickness - 300, basement base width - 500.
- basement depth - 2.5m:
- basement wall length up to 3 m: wall thickness - 250, basement base width - 500;
- basement wall length 3-4 m: wall thickness - 300, basement base width - 600.


Further, it is important to optimally adjust the parameters by adjusting the norms of specific pressure on the soil of the sole in accordance with the calculated resistance of the soil - the ability to withstand a certain load of the entire structure without settling it.
The design soil resistance should be greater than the parameters of the specific load from the building. This point is a weighty requirement in the process of designing the base of a house, according to which, in order to obtain linear dimensions, it is necessary to elementarily solve an arithmetic inequality.
When drawing up the drawing, it is essential that this difference be 15-20% of the specific load of the structure in favor of the value of the soil's ability to withstand the pressure from the building.

In accordance with the types of soil, the following design resistances are displayed:
- Coarse soil, crushed stone, gravel - 500-600 kPa.
- Sand:
- gravelly and large - 350-450 kPa;
- medium size - 250-350 kPa;
- fine and dusty dense - 200-300 kPa;
- medium density - 100-200 kPa;
- Hard and plastic sandy loam - 200-300 kPa;
- Loam hard and plastic - 100-300 kPa;
- Clay:
- solid - 300-600 kPa;
- plastic - 100-300 kPa;
100 kPa = 1kg / cm²
Having corrected the results obtained, we obtain the approximate geometric parameters of the structure foundation.
In addition, today's technologies can significantly simplify calculations using special calculators on developers' websites. By specifying the dimensions of the base and the applied construction material, the total cost of the foundation construction can be calculated.

Mounting
To install the strip foundation with your own hands you will need:
- round and corrugated reinforcement elements;
- galvanized steel wire;
- sand;
- edged boards;
- wooden blocks;
- a set of nails, self-tapping screws;
- waterproofing material for the foundation and formwork walls;
- concrete (predominantly factory-made) and appropriate materials for it.

Markup
Having planned to build a structure on the site, it is worthwhile to first investigate the place where the construction is planned.
There are some rules for choosing a place for a foundation:
- Immediately after the snow melts, it is important to pay attention to the presence of cracks (indicate soil heterogeneity - freezing will lead to a rise) or failures (indicate the presence of water veins).
- The presence of other buildings on the site makes it possible to assess the quality of the soil. You can make sure that the soil is uniform by digging a trench at an angle at the house. The imperfection of the soil indicates the unfavorableness of the place for construction. And if cracks are noticed on the foundation, then it is better to postpone the construction.
- As mentioned above, carry out a hydrogeological assessment of the soil.
Having decided that the selected site meets all the standards, you should start marking the site. First of all, it needs to be leveled and get rid of weeds and debris.


For marking work you will need:
- marking cord or fishing line;
- roulette;
- wooden pegs;
- level;
- pencil and paper;
- hammer.
The first line of the marking is defining - it is from it that all other boundaries will be measured. In this case, it is important to establish an object that will serve as a reference point. It could be another structure, a road, or a fence.
The first peg is the right corner of the building. The second is installed at a distance equal to the length or width of the structure. The pegs are connected to each other with a special marking cord or tape. The rest are clogged in the same way.
Having defined the external boundaries, you can go to the internal ones. For this, temporary pegs are used, which are installed at a distance of the width of the strip foundation on both sides of the corner markings. Opposite marks are also connected with a cord.
Lines of load-bearing walls and partitions are installed in a similar way. The intended windows and doors are highlighted with pegs.


Excavation
When the marking stage is completed, the cords are temporarily removed and trenches are dug out along the marks on the ground under the external load-bearing walls of the structure along the entire perimeter of the marking. The internal space is pulled out only if it is supposed to arrange a basement or basement room.
Established requirements for conducting earthworks specified in SNiP 3.02.01-87 o earthworks, bases and foundations.
The depth of the trenches should be greater than the design depth of the foundation. Do not forget about the obligatory preparatory layer of concrete or bulk material. If the excavated cut significantly exceeds the depth, taking into account the reserve, you can replenish this volume with the same soil or rubble, sand. However, if the overkill exceeds more than 50 cm, you should contact the designers.
It is important to take into account the safety of workers - the excessive depth of the pit requires strengthening the walls of the trench.
In accordance with regulatory documents, attachments are not required if the depth is:
- for bulk, sandy and coarse-grained soils - 1 m;
- for sandy loam - 1.25 m;
- for loam and clay - 1.5 m.


Typically, for the construction of a small building, the average trench depth is 400 mm.
The width of the excavation must correspond to the plan, which already takes into account the thickness of the formwork, the parameters of the underlying preparation, the protrusion of which beyond the lateral boundaries of the base is allowed at least 100 mm.
The usual parameters are considered to be the width of the trench, equal to the width of the tape plus 600-800 mm.
Important! In order for the bottom of the pit to be a perfectly flat surface, a water level should be used.

Formwork
This element represents the shape for the intended foundation. The material for the formwork is most often wood due to its availability in terms of cost and ease of implementation. Removable or non-removable metal formwork is also actively used.
In addition, depending on the material, the following types differ:
- aluminum;
- steel;
- plastic;
- combined.
Classifying the formwork depending on the type of construction, there are:
- large-board;
- small-shield;
- volumetric adjustable;
- block;
- sliding;
- horizontally movable;
- lifting and adjustable.


Grouping the types of formwork by thermal conductivity, they differ:
- insulated;
- not insulated.
The structure of the formwork consists of:
- deck with shields;
- fasteners (screws, corners, nails);
- props, struts and frames for support.


To install, you need the following materials:
- lighthouse board;
- board for shields;
- fight from longitudinal boards;
- tension hook;
- spring bracket;
- ladder;
- shovel;
- concreting area.
The number of listed materials depends on the parameters of the strip foundation.


The installation itself provides for strict adherence to the established requirements:
- the installation of the formwork is preceded by a thorough cleaning of the site from debris, stumps, plant roots, and the elimination of any irregularities;
- the side of the formwork in contact with the concrete is ideally cleaned and leveled;
- the reattachment occurs in such a way as to prevent shrinkage during concreting - such deformation can adversely affect the entire structure as a whole;
- formwork panels are connected to each other as tightly as possible;
- all formwork fastenings are carefully checked - the compliance of the actual dimensions with the design ones is checked with a barometer, a level is used to control the horizontal position, the verticality - a plumb line;
- if the type of formwork allows you to remove it, then for reuse it is important to clean the fasteners and shields from debris and traces of concrete.


Step-by-step instructions for arranging continuous formwork for a strip base:
- To level the surface, the lighthouse boards are installed.
- With an interval of 4 m, formwork panels are attached on both sides, which are fastened with struts for rigidity and spacers that provide a fixed thickness of the base strip.
- The foundation will turn out to be even only if the number of shields between the beacon boards is the same.
- The grapples, which are longitudinal boards, are nailed to the sides of the backboards for horizontal alignment and stability.
- The contractions are stabilized by inclined struts that allow the backboards to be vertically aligned.
- Shields are fixed with tensioning hooks or spring clips.
- Solid formwork is usually obtained with a height of more than a meter, which requires the installation of stairs and platforms for concreting.
- If necessary, the analysis of the structure is carried out in the reverse order.


Installation of a stepped structure goes through several stages. Each next tier of formwork is preceded by another of the same tier:
- the first stage of the formwork;
- concreting;
- second stage of formwork;
- concreting;
- the installation of the required parameters is carried out according to the same scheme.
The installation of stepped formwork is also possible at once, like the assembly mechanism for a solid structure. In this case, it is important to adhere to the horizontal and vertical arrangement of the parts.
During the formwork phase, the planning of the ventilation holes is an essential issue. Air vents should be located at least 20 cm above the ground. However, it is worth considering seasonal flooding and varying the location depending on this factor.
The best material for the ventilation hole is a round plastic or asbestos-cement pipe with a diameter of 110-130 mm. Wooden beams have a tendency to stick to the concrete base, which makes them difficult to remove afterwards.

The diameter of the vents is determined depending on the size of the building and can reach from 100 to 150 cm.These ventilation holes in the walls are located strictly parallel to each other at a distance of 2.5-3 m.
With all the need for airflows, there are cases when the presence of holes is not required without fail:
- the room already has ventilation vents in the floor of the building;
- between the pillars of the foundation, a material with sufficient vapor permeability is used;
- a powerful and stable ventilation system is available;
- The vapor-proof material covers sand or soil compacted in the basement.
Understanding the variety of material classifications contributes to the correct selection of fittings.
Depending on the manufacturing technology, the fittings may differ:
- wire or cold rolled;
- rod or hot rolled.


Depending on the type of surface, the rods:
- with a periodic profile (corrugations), providing maximum connection with concrete;
- smooth.
By destination:
- rods used in conventional reinforced concrete structures;
- prestressing rods.
Most often, reinforcement in accordance with GOST 5781 is used for strip foundations - a hot-rolled element applicable for conventional and pre-stressing reinforced structures.
In addition, in accordance with the grades of steel, and, consequently, the physical and mechanical properties, the reinforcement rods differ from A-I to A-VI. For the manufacture of elements of the initial class, low-carbon steel is used, in high classes - properties close to alloy steel.


In the planned areas with the greatest load, installation fittings are installed in the direction of the expected additional pressure. Such places are the corners of the structure, the areas with the highest walls, the base under the balcony or terrace.
When installing a structure from reinforcement, intersections, abutments and corners are formed. Such an incompletely assembled unit can lead to a crack or subsidence of the foundation.
That is why, for reliability, they are used:
- legs - L-shaped bend (inner and outer), attached to the outer working part of the frame made of reinforcement;
- cross clamp;
- gain.
It is important to remember that each class of reinforcement has its own specific parameters of the permissible bending angle and curvature.
In a one-piece frame, the parts are connected in two ways:
- Welding, involving special equipment, the availability of electricity and a specialist who will do it all.
- Knitting possible with a simple screw hook, mounting wire (30 cm per intersection). It is considered the most reliable method, albeit time consuming. Its convenience lies in the fact that, if necessary (bending load), the rod can be slightly shifted, thereby relieving the pressure on the concrete layer and protecting it from damage.


You can make a hook if you take a thick and durable metal rod. A handle is made from one edge for more convenient use, the other is bent in the form of a hook. Having folded the mounting wire in half, form a loop at one of the ends. After that, it should be wrapped around the reinforced knot, putting the hook into the loop so that it rests against one of the "tails", and the second "tail" is wrapped with a mounting wire, carefully tightening around the reinforcing bar.
All metal parts are carefully protected with a layer of concrete (at least 10 mm) to prevent acid corrosion.
Calculations of the amount of reinforcement that will be needed for the construction of a strip foundation require the determination of the following parameters:
- dimensions of the total length of the foundation tape (external and, if available, internal lintels);
- the number of elements for longitudinal reinforcement (you can use the calculator on the manufacturers website);
- the number of reinforcement points (the number of corners and junctions of the foundation strips);
- the parameters of the overlap of the reinforcement elements.
SNiP norms indicate parameters total area sections of longitudinal reinforcement elements, which will be at least 0.1% of the cross-sectional area.


Fill
Flood monolithic foundation recommended with concrete in layers 20 cm thick, after which the tier is compacted with a concrete vibrator to avoid voids. If concrete is poured in winter, which is undesirable, then it is necessary to insulate it with the help of materials at hand. In dry seasons, it is recommended to use water to create a damp effect, otherwise it may affect its strength.
The consistency of the concrete must be the same for each layer, and the pouring must be done on the same day., because low level adhesion (a method of adhesion of surfaces of dissimilar solid or liquid consistencies) can lead to cracking. In the event that it is impossible to fill it in one day, it is important to at least pour water over the concrete surface abundantly and, in order to maintain dampness, cover it with plastic wrap on top.
The concrete must settle. After 10 days, the walls of the base are treated outside with bitumen mastic and a waterproofing material (most often roofing material) is glued to protect against water penetration.
The next stage is backfilling the cavities of the strip foundation with sand, which is also laid in layers, while carefully tamping each tier. Before laying the next layer, the sand is watered.

A correctly installed strip foundation is a guarantee of long years of operation of the building.
It is important to clearly maintain a constant foundation depth throughout the entire area. construction site, since minor deviations lead to a difference in soil density, moisture saturation, which jeopardizes the reliability and durability of the foundation.
Among the often encountered omissions in the construction of the foundation of a building are mainly inexperience, inattention and frivolity to installation, as well as:
- insufficiently thorough study of hydrogeological properties and soil level;
- the use of cheap and low-quality building materials;
- the unprofessionalism of the builders is demonstrated by damage to the waterproofing layer, curved markings, unevenly laid pillow, violation of the angle value;
- failure to comply with the deadlines for removing the formwork, drying the concrete layer and other time stages.
In order to avoid such errors, it is fundamentally important to contact only specialists who are engaged in the installation of foundations of structures, and try to follow the stages of construction. If, nevertheless, the installation of the base is planned independently, it would be preferable to consult with specialists in this field before starting work.
An important topic in the construction of the foundation is the question of the recommended season for such work. As mentioned above, winter and late autumn are considered undesirable times, since frozen and soggy soil leads to inconvenience, slowing down construction works, and, importantly, the shrinkage of the foundation and the appearance of cracks on the already finished structure... Professionals point out that the optimal time for construction is warm and dry periods (depending on the region, these intervals fall on different months).


Sometimes, after the construction of the foundation and the operation of the building, the idea of expanding the living space of the house comes up. This question requires a close analysis of the condition of the foundation. With insufficient strength, construction can lead to the fact that the foundation will burst, sag or cracks on the walls. Such an outcome can lead to the complete destruction of the building.
However, if the state of the foundation does not allow the completion of the building, you should not be upset. In this case, there are some tricks in the form of strengthening the foundation of the structure.
This process can be carried out in several ways:
- in case of minor damage to the foundation, it is sufficient to restore the hydro- and heat-insulating layer;
- more expensive is the expansion of the foundation;
- often use the method of replacing soil under the base of the house;
- using various types of piles;
- by creating a reinforced concrete jacket that prevents collapse when cracks appear on the walls;
- reinforcement with monolithic clips strengthens the base throughout its entire thickness. This method involves the use of a double-sided reinforced concrete frame or tubes that inject a solution that freely fills all the voids in the masonry.
The most important thing when erecting any type of foundation is to correctly determine the required type, carry out a thorough calculation of all parameters, follow the instructions step by step to perform all the actions, adhere to the rules and advice of specialists and, of course, enlist the support of assistants.
The technology of the strip foundation is in the next video.
The base of the building is the most important part of it. The slightest mistake in the construction of such structures can end in disaster. It is necessary not only to correctly calculate its depth, the number and cross-section of the reinforcement, but also to provide reliable and high-quality drainage, hydro and thermal insulation. We will describe the process of making a strip foundation with our own hands and step-by-step instructions for its construction in detail.
What type of foundation should you choose?
The choice of the type of foundation depends on the mass of the building, the type of soil and the depth of its freezing.

By type of construction, all bases are divided into:
- tape: the most common, are made in the form of a closed loop, due to which the load on the ground from the structure is transmitted evenly; it is laid not only under the walls, but also under the walls of the building; such bases, in turn, are divided into shallow and deeply buried
- pile: the building is installed on vertical rods (piles) with a depth of 3-20 m; used for difficult terrain, great depth of soil freezing and in marshy areas; disadvantages include the need to use special equipment for driving piles into the ground and the absence of basements; with horizontal movements of the soil are unacceptable
- pile-grillage: with load-bearing horizontal beams (grillage) connecting the piles in the upper part; to protect it from frost heaving, it is never buried in the ground
- columnar: on pillars with an extension in the form of a "sole"; erection on soils with deep freezing is allowed; supports connected by jumpers (random beams) are placed every 3 m
- slab: a rather expensive structure in the form of monolithic slab 20-30 cm thick, lying on the surface of the soil, which also serves as the floor of the building

Heavy buildings and multi-storey buildings are usually erected using strip foundation. Columnar foundations economically more profitable, and it is allowed to build light frame or wooden houses on them, but only if the soil is not peaty and not heaving clay.
Pile structures can be used even with a significant mass of the structure. But they are mainly used on land plots with a weak sandy or peaty soil, as well as in the Far North with a great depth of soil freezing. To avoid movement, the piles are not installed in pits, but driven in or screwed into the ground.

Slab shallow foundations it is wiser to use it on problem areas with high soil mobility. Such a "floating" base is able to withstand even significant soil movements without damage to the building.
Pouring of the foundation is allowed at temperatures from +5 C. Work at low temperatures in order to avoid cracking of concrete is unacceptable.

VIDEO: Choosing a foundation for a house

Although the cost of such a support is quite high and averages 25-30% of the price of the entire object, due to its high strength and reliability, this option is most often used. Below will be presented a detailed step-by-step instruction manufacture of strip foundation.
Depth of laying
There are two types of tape bases:
- shallow buried with 50-70 cm buried; used only for light buildings
- deep-buried up to 2 m: should go into the ground 20-30 cm below the level of soil freezing
It is not difficult to find out to what depth the soil freezes in your area. For this there are special cards... However, teach that this value is normative. In practice, it is necessary to take into account the type of soil and the average monthly temperature of the region of residence. Also, learn that wet swampy soil always freezes more than sandy soil. Dense soil freezes harder than loose soil.

In the Moscow region, the standard frost penetration depth is 140 cm. When the foundation is laid, another 10% is added to these figures. For unheated rooms, add another 10%. In the presence of a basement, the base drops 40 cm below its floor. It is also necessary to take into account the height of the drainage layer and the sand cushion.
Ideally, only geologists can answer the question of what the depth of the foundation should be. Neither tables nor maps can show the presence of dangerous quicksands, the level of groundwater, various disturbances in the composition of the soil, etc.
On soft soils, it is better to erect a strip foundation in the form of a trapezoid or make it stepped. Such a foundation will be more reliable.
Trench width
See also: A septic tank for home - a sewer pit without pumping out: device, stage-by-stage DIY production from concrete rings and other options (15 Photos & Videos) + Reviews

Types of trenches for the foundation
The width of the structure is calculated based on the width of the walls plus 10 cm. To this value, add 40-60 cm to allow people to pass during the installation and pouring of the formwork. On average, the width of the trench is 0.7-0.8 m.When arranging the drainage system, this parameter is increased by another 20-30 cm.
So that there is no difference in height, they begin to dig a trench from the highest angle. It is advisable to do this manually - when digging with an excavator, it will not work to get perfectly flat walls without shedding the soil.
The crumbling soil is completely removed - after all, even compacted, it is inferior in density to the soil that has compressed over the years. It is not worth taking away part of the land - it will be used for backfilling.
If the ground crumbles heavily, dig the trench at a slight angle.... You can additionally reinforce it with plywood or board panels with spacers. If there is a basement, a pit is immediately prepared for it.

Before starting work, the vegetative layer of soil (sod) is completely removed to a depth of 20-30 cm... On chernozem soil, the construction of a foundation is unacceptable. The loose soil layer must be completely removed.
When carrying out the markup, the width of the walls is added to the design dimensions of the building. It starts from the corners where the pegs or reinforcement rods are driven. A string or fishing line is pulled tightly between them. The horizontality and verticality of the sides must be verified by the building level. The corners must be strictly straight. It is also necessary to double-check the diagonal dimensions.
If winter is approaching, and there is no way to wait for the concrete to gain strength, you can assemble the foundation from ready-made concrete blocks. However, keep in mind that their joints are a weak point. In the event of soil movement, ruptures may form in these places.
Sand and crushed stone pillow
Before building the foundation for the house, you should take care of the arrangement of the pillow. Materials such as sand, crushed stone and gravel hardly absorb moisture, therefore they are less prone to frost heaving. The use of a pillow based on them allows you to protect the site from uneven soil shrinkage. The pillow allows you to more evenly redistribute the load from the mass of the building over the entire area. The soil underneath will shrink more evenly.

The layer of such a pillow should be 20 cm. So that it does not silt up, a layer of film or roofing material is laid before filling it. The same layer of waterproofing is required to be laid after filling crushed stone and sand.
Sand must be spilled with water, and then tamped with a vibratory rammer or by means of a special device in the form of a wooden block with a vertical handle.
"Correct" formwork

The most common foundation problems are:
- break of formwork
- her bursting
- concrete leaks
To avoid such mistakes, you should not rely on chance and use waste lumber. For the manufacture of formwork for the foundation, a flat board with a thickness of 25 mm without significant defects, 2 grades is required. In the future, after disassembling the formwork, it can be used to equip the lathing.
Too large shields will be inconvenient to work - they are made with a length of 3-4 m and assembled with nails. For the cross posts, a rail or the same board is used. In order to avoid leakage of the solution, there should be no space between the boards.
After lowering into the trench and leveling, the shields are fixed with pegs driven into the ground. In the future, they do not need to be removed - they remain in the concrete. From the outside, the formwork is additionally reinforced with props. The distance between them is at least 1 m.
All shields are interconnected with wooden slats. To prevent the formwork from swelling, the boards are tied with wire, which is screwed to the vertical cross-members. During the parsing of the formwork, it is chopped off and left in the concrete.
Roofing material is often used as a waterproofing layer. It is fastened with slate nails.
Fitting installation
Read also:
In the strip foundation, the reinforcement should be exposed in the form of a rectangle... There is a logical explanation for this. Two forces act on the support of the structure at once: the heaving forces from below and the mass of the structure itself from above. There is practically no load in the middle of the tape. To compensate for these two loads, two belts are prepared: an upper and a lower one.
When deepening the foundation to a depth of 1 m, this is sufficient. For a deeply buried base, three belts are prepared: the third is required for reinforcement at a high height of the reinforcing cage.

Smooth rods are only allowed when creating bridges. For the main frame, reinforcement with a ribbed surface with a diameter of 8-16 mm is used, able to withstand tensile loads. The ribbed surface is capable of providing better adhesion to concrete. Steel grades of reinforcement for the foundation SGS, 25G2S, 32G2Rps.
To protect the metal from corrosion, the reinforcement should be located only in the thickness of the concrete. Therefore, at the edges and bottom of the formwork, it is necessary to retreat 5 cm. According to SNiP, the step of reinforcement is 30-35 cm.
The corners and walls, which are subject to the load from adjacent walls, are the weakest points. In order to avoid the appearance of cracks, the rods in these places are bent over each other at an angle of 90 degrees with an overlap of 60-70 cm. If there is a shortage of the length of the rod, they are connected with L-shaped clamps.
See also: Making and laying paving slabs with your own hands: step-by-step instructions for dry and wet mix. Making a mold, vibrating table (Photo & Video) + Reviews

It is undesirable to use welding for fittings. Firstly, in the places of welding, the steel partially loses its strength. Secondly, the load-bearing frame of the foundation must have a certain degree of freedom so that it does not break when the soil moves.
Therefore, it is necessary to fasten the reinforcement using knitting. For this, use a special wire. Knitting is done manually, and for large volumes of work with a pistol. It is more convenient to use a special hook for working with wire.
With a significant difference in height, it is better to divide the foundation into sectors, where each sector is in the ground at a different depth.
We check the quality of cement
Before giving detailed instructions for the construction of the foundation, let's talk about the quality of the cement. When pouring the base for a house, it is definitely not worth saving on cement. According to GOST, it must be at least M200-300 grades. But it is better to play it safe and use M400-500 cement. This is especially important when erecting heavy or multi-storey buildings. Indeed, in practice, today's cement is often produced not of the best quality.
See also: Do-it-yourself drip irrigation device in a greenhouse: from a barrel, a plastic bottle and even an automatic system. For tomatoes and other crops (Photo & Video) + Reviews

Quality concrete is dark gray in color. It should be fresh and not caked - when clenched in a fist, it should easily spill out between the fingers. Since this material is able to quickly absorb moisture, if purchased in advance, store it in a dry place, tightening it with plastic wrap for no more than 1-2 weeks.
It is difficult to focus on the manufacturer - after all, each region produces its own cement. Therefore, it is better to make a test batch of the solution.
After it has solidified, it is necessary to install a chisel on the surface of the concrete and hit it with a hammer. You should only have a small scratch mark. Chipping off small pieces means that, even if the manufacturer assured you otherwise, the brand of such cement is not more than M200. Holes in concrete after impact appear when pouring M100 cement.

The inside of the dried concrete should be darker than on the surface. After a month, it should be difficult to hammer a nail into high-quality concrete. In the conditions of Siberia and the North, it is important to pay attention to the frost resistance of the material. Such concrete is labeled ML.
Preparing concrete solution
The correct foundation must be made of high quality mortar. E Its proportions are in direct proportion to the brand of cement. So, when using cement of grades M400, the volume ratio will be 1.0: 1.2: 2.7 (cement, sand, crushed stone are taken for mixing).

| Concrete grade | Volume proportions cement / sand / crushed stone | Weight proportions cement / sand / crushed stone | Approximate volume of concrete from 50 kg of cement (1 bag), m3 |
|---|---|---|---|
| M100 | 1,0/4,1/6,1 | 1,0/4,6/7,0 | 0,231 |
| M150 | 1,0/3,2/5,0 | 1,0/3,5/5,7 | 0,189 |
| M200 | 1,0/2,5/4,2 | 1,0/2,8/4,8 | 0,160 |
| M250 | 1,0/1,9/3,4 | 1,0/2,1/3,9 | 0,128 |
| M300 | 1,0/1,7/3,2 | 1,0/1,9/3,7 | 0,122 |
| M400 | 1,0/1,1/2,4 | 1,0/1,2/2,7 | 0,092 |
The sand is used dry, without clay and debris. To remove large particles, sand must be sieved through a sieve. Crushed stone will need a fine fraction with a particle size of 5-20 mm. The use of river gravel, which has low strength, is undesirable instead. Plus, its grains have a too smooth surface and do not adhere well to concrete.
First, it is necessary to thoroughly mix the dry mixture with each other, and only then add water to it. If the mixing is done manually, then it must be done in small portions, otherwise, in the case of non-mixing, lumps form in the solution. The resulting mortar should be thick enough and not drip off the trowel.
Remove the formwork no earlier than a couple of weeks after pouring. Any work before the expiration of this time is unacceptable.
Pouring the foundation
The strip foundation is made in the form of a solid concrete canvas passing along the perimeter of the walls and internal partitions. When erecting light structures, the erection of brick foundations is allowed.

There are many types of foundations for the construction of wooden structures, small houses or massive buildings. The most popular in the construction in the private sector is the strip foundation. Because, this is the most affordable way erecting the foundation of a house, which you can do yourself. In addition, this option allows you to lay down a basement or basement in the project.
Due to its versatility, such a foundation can be used: for a house, for a bath, under a garage or under a porch. In the article we will talk about the advantages and disadvantages of the strip foundation, consider what types there are and tell with the help of a short instruction how to build it yourself.
Features of the strip foundation
It should be noted that the LF is not suitable for swampy areas and requires compulsory waterproofing and thermal insulation works, which we will discuss below. Depending on the project, soil and soil, heavy construction equipment and complex earthworks may be required. In any case, these factors will depend on the depth of the foundation.
Fill the strip foundation
Despite this, there are several arguments in favor of this type of foundation:
- you can make the foundation yourself;
- high strength and reliability;
- you can add a basement or basement to the project;
- high bearing capacity;
- possible device on unstable soils;
There are 3 types of strip foundations, which differ in the depth of the structure:

According to the name, we can conclude that for a multi-storey building, you should use a recessed tape that can withstand heavy loads. And the first two are suitable for light buildings (small brick or wooden house for example).

Also distinguish solid cast and made strip foundation. In the precast method, ready-made concrete slabs are used, from which a tape is built and fastened with cement.

With the solid-cast method, the base for the foundation is erected directly at the construction site, after which the concrete is poured. This method is also called monolithic. It should be noted that to perform independent work, it is preferable to use the monolithic option, since it does not require complex lifting equipment. We have prepared the instructions for this method for you.

Comparative table of foundation types
| Monolithic slab | Strip foundation | Screw piles |
| Construction period is 1 week. | Construction period is 1 week. | The construction period is several days. |
| Construction is allowed after a month from filling. | Construction is allowed after 20 days from pouring. | Due to its loosening when screwing in the pile, the foundation requires soil shrinkage. |
| The permissible foundation load is 3 tons per sq. M. | The permissible foundation load is 17 tons per sq. M. | The permissible load on one pile is not more than 3 tons. |
| Service life is over a century. | Service life is over a century. | Service life is about 35 years. |
| When constructing with a slope, a combination with screw piles is required. | The soil and soil must meet the requirements for installation. | |
| You cannot include an underground room in the project. | You can make a basement or basement. But waterproofing work is required. | — |
| The construction of the foundation will cost 250-350 tr. with an area of 9x9 m. | The construction of the foundation will cost 200 thousand rubles. with an area of 9x9 m. | The construction of the foundation will cost 150-180 tr. with an area of 9x9 m. |
DIY strip foundation step by step instructions:
The service life of the structure will depend on the quality and strength of the base. Therefore, we suggest that you familiarize yourself with all the nuances and requirements for technological process erection of a strip foundation.
Preparatory work
Before the start of any construction, preparatory work is underway. Which include the design of the structure, marking, as well as conducting geological surveys.
You need to order geological foreclosure from a specialized company. Which will accurately determine the structure of the soil, the depth of soil freezing and the passage of deep waters.
Based on this data, it will be possible to determine the elevation and thickness of the tape. When geological studies are completed, you can proceed to the next stage.
Before applying the markings, you need to remove the top layer of the earth, where the future building will be. Usually this is a layer up to 0.5 meters (where there will be no plant roots). Then, along the perimeter of the tape, markings are made using a cord or wire, which can be fixed with reinforcement or a peg. It is better to install the stakes a little further than the axes of the walls so that our markings do not interfere and do not sag during further excavation work. Marking allows you to adjust the level of height over the entire area of construction work. So you can do everything exactly according to the level.

When you have made the markup, digging of trenches for the foundation begins, according to the markings applied on the project and the depth of the structure. If you have a basement, then a foundation pit is still being dug. This is the most time consuming process. You will need to manually dig trenches at a single level from 1 meter to 1.5 meters.
Only a geological study of the soil can give an exact answer whether it is necessary to make an underground drainage system or not. Therefore, drainage may not be a prerequisite for a high-quality foundation, sometimes you can do without it.
To arrange drainage, it is necessary to deepen the sole of the tape by 25-35 cm. Create a general slope of the system to one side by 4 degrees. After that, drainage pipes are placed to remove moisture. This allows you to keep the soil of the house structure dry. The drainage is filled with sand and gravel, to the level of the bottom of the trench. After that, a pillow is made under the foundation.


The sandy substrate will redistribute the load on the future foundation. To make the right pillow, you need to level the bottom of the trench with sand and gravel. Layer-by-layer fill over the drainage with a sealant, 10-15 centimeters each. The height of the sand pillow should be up to 50 cm.
When covering the bottom with sand and fine gravel, try to immediately tamp the nonmetallic material by pouring water on it. The cushion and drainage will ensure the foundation will last for many years and prevent it from collapsing.
To prevent the destruction of the walls and the loss of the strength of the entire concrete structure, it is necessary to strengthen it by applying a reinforcing mesh. Therefore, before pouring the formwork with concrete, a strong and reliable frame is made of steel rods, which strengthens the foundation of the building. A short instruction will help to correctly reinforce the strip foundation:

- iron rods are inserted vertically every 15-20 cm (high-rise before marking the foundation line, not higher);
- after which the long reinforcement is carried out horizontally and fastened with a dressing wire (it is also possible by welding, but the wire is more reliable in our case);
- after all the work, you should have a frame, with cells of 15-25 centimeters around the entire perimeter of the formwork;
Formwork is a structure made of wood that is used as a form for the future foundation. You can make it from boards. The formwork for the strip foundation must withstand a huge mass of concrete poured into it. Therefore, you need to make it immediately strong. If, in the process of pouring cement, the formwork device begins to collapse, then you will have to stop work and start collecting the formwork again.

The walls of the formwork should be made above the level of the future foundation. This will prevent the solution from overflowing. To adjust the fill level mark, additional markings are pulled along which you will need to navigate.
Do not forget to lay plastic mortgages for communications in the formwork, and so that there are airflows.
After all preparatory work, it is necessary to fill our formwork with concrete. The mixture can be made independently from cement, sand and gravel, in proportions of 1: 3: 3. This option is the most budgetary, but requires a lot of physical exertion to mix the solution and pour. The mixture should turn out to be a thick and homogeneous mass. After pouring, the solution must be tamped, and make sure that no bubbles form. This can be done by piercing the filled solution with a piece of reinforcement.

It is recommended to fill in the shallow and shallow strip foundation immediately. And the buried one is poured in several stages. You need to pour no more than 70 cm of concrete at a time, with interruptions no more than two hours. After 12 hours, you can continue pouring the grout.
The pile-strip foundation dries for about 1 week in summer. Dismantling of the formwork should be carried out when the solution hardens by 60%, but at least 3 days.
In addition to monolithic filling, you can order a ready-made solution. This method is more expensive, but this way the formwork will be filled with high quality and quickly. It is best to order M300 solution.
A more expensive method of formwork construction is the use of block technologies. The finished foundation blocks are lined up in a tape, while there is no need to make a formwork and wait about a month until the solution hardens. But initially for the blocks, you need to make wider trenches.
4 days after the foundation is poured, it is necessary to make a blind area away from the walls to drain rainwater. At any time of the year, it is important to look after the foundation and prevent water loss from the surface of the structure after installation. For this, the concrete is covered with foil and poured with water for a week. These methods will help you avoid damaging the walls of your foundation.

In the summer, various chemical additives can be used to slow down the process of hydration and heat release. In winter, it is necessary to prevent the freezing process, because at a level below 0, all the water freezes and destroys the structure from the inside.
Conclusion
This type of foundation can easily withstand a house or several-storey cottage. In order for the structure to serve as long as possible and the foundation does not crumble, you need to follow certain rules during construction, which we talked about above. In order to save money, the strip foundation can be built independently with a monolithic fill or using ready-made blocks. The only difference is in the time and the need to make the formwork.
Video instruction
One of the most popular types of foundations is strip foundations. It owes such popularity to its reliability, durability, and most importantly - the low cost of construction, in comparison with other types of foundations. Also, the popularity of the "tape" deserves due to the fact that you can build a strip foundation for a house - with your own hands, the step-by-step instructions contained in this article will help in construction without resorting to the services of construction companies.
To begin with, consider the types of strip foundations, the choice of which depends on a number of factors, such as the material of the future walls of the house and the type of soil on the site.
For small buildings with walls made of light materials (wood, foam block, frame, etc.), a shallow strip foundation is the best solution. At the cost of construction, this type is second only to pile foundations, but it has an advantage when arranging the basement of the house, and its further insulation.
When building a shallow strip foundation on heaving soils, a prerequisite is the insulation of the base of the strip between the pillow and the concrete. On sandy soils, only the foundation blind area can be insulated, since heaving will be minimal. These are, in principle, all the characteristic differences of a shallow tape.
Recessed strip foundation
The deepened strip foundation is used for large houses with heavy walls, for often a full basement or underground parking in such houses. Such a foundation is erected in two ways: by pouring concrete into the formwork at the construction site, or using foundation blocks of massive sizes. In one case or another, one cannot do without the use of special equipment when erecting a buried strip foundation.

When erecting a buried strip foundation with your own hands, it must be borne in mind that the depth of occurrence should be below the level of freezing of the soil. It is also important to think carefully about the feasibility of using a buried tape, because the cost of building this type of foundation significantly increases final price at home.
When the recessed tape is realized under the house, a large general room is formed, which can be equipped with a full basement floor with all communications and ventilation. Which will increase the amount of usable space in the house. To implement this approach, all that remains is to concrete the basement floor, and the foundation itself will play the role of the walls.
Pile strip foundation
Another type of foundation is a hybrid of piles and tape - pile-strip foundation.
From the visual side, this foundation is no different from the strip foundation, it passes monolithic wall under all the load-bearing walls of the building, but the lower part of the foundation looks somewhat different.

It is based on a pile foundation, which takes the bulk of the load from the house. The tape is located on top of the piles and is firmly connected by reinforcement. The main role of the tape is to evenly distribute the load of the house on the piles. This type of foundations is suitable for light houses on heaving soils. But I often use this option for brick houses in 2 floors, this requires a detailed soil analysis and serious calculations by professional builders.
Increasingly, the pile-strip foundation is used in private housing construction, this is due to the fact that it is easy to do it yourself without the use of special equipment. Consider the advantages and disadvantages of pile-tape foundation.
Advantages:
- This option is cheaper than the classic strip foundation, since piles are laid at the base, and only the upper part is made of a monolithic slab.
- There is no need to dig a deep trench, just a small depression and drilling holes for piles, thereby saving you time and effort during construction.
- Pile-strip foundations are ideal for construction on difficult terrain and on areas with a slope
- This foundation is not afraid of heaving, and it also tolerates seasonal ground movements well.
Disadvantages:
- There is no possibility of arranging a basement room
- Suitable only for a light type of building.
As a conclusion, we can say that this foundation is ideal for building a house with your own hands.
Step-by-step instructions for the construction of a strip foundation
Next, consider the step-by-step instructions for building a strip foundation with your own hands. Before building the foundation, it is necessary to analyze the soil to identify the presence of sand in it, this is necessary to determine the advisability of filling a sand cushion. Also, determine the level of groundwater, you can talk with neighbors who have newly built houses.
Determination of the tape depth
The depth of the strip foundation depends on the following factors:
- type of soil;
- freezing depth;
- ground water level;
- the complexity of the landscape;
- the presence of a basement in the project;
- seismic stability of the region;
- type of building and wall material
All this directly or indirectly affects the depth of the tape.
Marking for a strip foundation
After the calculation of the foundation is completed and you have decided on the location of the future house on the site, you need to start marking the strip foundation. For marking, a measuring tape is required with a length of at least the diagonal of the future house, usually a 20 meter one is used. You will also need stakes (pieces of reinforcement), lacing and a hammer.
Usually, the markings start from the front part, since it is located on the side of the road and there will be an entrance to the house. We decide on the distance of the facade from the road and drive in the first peg at the corner of the future house, then from the peg it is necessary to measure the length of the front wall and drive in the second peg. After that, it is necessary to achieve parallelism to the road or the perimeter of the site of the future house. We pull the cord between the existing stakes, measure the distance from the cord to the border in several places, if necessary, move the stakes to achieve the necessary results.
After 2 pegs are installed, pull the cord from one of the pegs perpendicular to the facade and measure the required length on the cord. At this point, we install the third peg. The easiest way to achieve perpendicularity is to measure 3 meters from the resulting angle on one cord, and on the other - 4. The resulting imaginary hypotenuse of the triangle should be equal to 5 meters. To do this, move the third peg so as to achieve a perpendicular.

Install the fourth peg in the same way. Then it is necessary to measure the diagonals of the resulting quadrangle, with correct calculations, they should be equal.
After all four pegs are installed, the lacing is taut and a check is made, it is necessary to mark the inner part of the foundation by indenting from the stretched cord at a distance equal to the thickness of the future foundation. If a basement is planned. Then the internal marking is done after the soil has been removed to the required basement height.
This completes the marking of the strip foundation, the only thing that can be done is to fill the foundation lines with plaster or sand so that the stakes can be removed.
Digging trenches
The most budgetary option for digging a trench is to do it yourself. This is very hard work and it will be very difficult to cope alone, if funds and location permit, it is better to hire an excavator that will cope with the task in a few hours. You can also hire a team of excavators who will make a trench in a couple of days, which will cost a little less than the option with an excavator.
The main thing is to make sure that the trench is dug strictly according to the markings and to the required depth.

How to reinforce a strip foundation
The reinforcement cage is the most important component of a solid strip foundation. The reinforcement takes on the loads of uneven pressure at home and distributes them over the entire foundation, and the reinforcement cage also "dampens" loads from heaving of soils.
What the reinforcement cage of the strip foundation consists of:
- Working reinforcement - carries the main load;
- Transverse horizontal reinforcement is a connecting element of the horizontal row of working reinforcement;
- Transverse vertical reinforcement - binds the working reinforcement in the vertical plane.
What kind of fittings to use
A strip foundation is a simple structure that works mainly in compression, there are some rules when choosing the right reinforcement without any calculations:
- minimum diameter of working reinforcement - 10mm,
- maximum - 40mm,
- if the length of the wall is up to 3 meters, then the diameter of the working reinforcement is 10 mm.,
- more than 3 meters - 12 mm.,
- more than 10 meters - 16 mm.,
- minimum diameter of transverse reinforcement - 6mm.,
- the minimum diameter of the transverse reinforcement for the buried strip foundation is 8mm.,
- the optimal diameter of the transverse reinforcement is 1/4 of the diameter of the working reinforcement.
Example: for foundation wooden house 6 by 8 meters, a working reinforcement with a diameter of 12 mm is required. and transverse reinforcement with a diameter of 6 mm.

If you are building a brick house, then choose fittings with a small margin, which in turn will give a margin of safety to the structure.
Rebar tying
The reinforcement for the strip foundation must be knitted, welding of the reinforcement is excluded due to the weakening of the reinforcement bar at the welding point.
Before starting to tie the frame from the reinforcement, it is necessary to provide for the availability of the necessary tools. For small foundations, a hand crochet hook is suitable, and for large volumes, special knitting guns are used, which speeds up the process of installing the frame.
A special annealed wire with a diameter of 0.8-1.4 mm is used as a connecting element. The use of other types of wire is not allowed.
The reinforcement is overlapped along the length, the main thing is to observe the minimum protrusions of the transverse reinforcement in relation to the longitudinal one.
In the corners, it is necessary to bend the reinforcement by 90 degrees to strengthen the structure. Also, instead of bending the reinforcement, pre-prepared L-shaped clamps are used, which simplifies the installation process.
You can see options for knitting reinforcement in this video:
Formwork for strip foundations
The formwork for the strip foundation is a volumetric structure consisting of panels. Here it is important to use reliable materials in order for the formwork to withstand a multi-ton mass of liquid concrete until it hardens.
Do-it-yourself formwork panels
The dimensions of the panels used depend on the complexity of the geometry and the height of the foundation. The shield should be in height with a small margin, to exclude pouring out of concrete. The optimal length of each formwork panel is 2 meters, with longer structures it is harder to work. The last shield along the length of the foundation wall is made according to the residual dimensions in accordance with the markings.

If you decide to make the formwork from the boards with your own hands, then you need to take several boards of the same length and fasten them with the help of bars, it is better to fasten the boards to the bar with self-tapping screws, since when using nails they must be driven in from the inside of the shield and bent from the side of the bar.
The first and last transverse bar is made longer than the others from the bottom of the shield, and the ends are sharpened. This is necessary to securely fix the shield in the ground.
When using plywood for formwork panels, it is important to run a block around the perimeter in order to give additional rigidity to the structure.
Installation of formwork panels
Shields are set up along stretched marking cords, it is important that the shields stand strictly along the line, and also be aligned in a vertical plane. To facilitate the process, you can drive additional vertically aligned bars into the ground earlier, which will serve as guides for the shields and additional support.
If, for some reason, there is a small gap left for the honey with a shield and soil, then in that place you can make a filling with soil, to prevent pouring out liquid concrete.
Reinforcement of the formwork
In order for the formwork not to fall apart when pouring concrete, it is necessary to strengthen it.
From the outer part of the formwork, braces are installed at least every meter, if the height of the formwork is more than 2 meters, then a second row of braces should be provided.
It is also necessary to provide for the internal reinforcement of the formwork, so that the width of the foundation is the same and the formwork does not disperse. To do this, it is necessary to install studs connecting two opposite parts of the formwork.
Studs are factory-made and made from fittings by hand.
A homemade hairpin is made from reinforcement, the length of the hairpin must match the width of the foundation.
One end of the reinforcement is bent, and on the other, a thread is cut and a nut with a wide washer is installed.
Installation of studs takes place in the following order:
- Through holes are drilled in the already mounted formwork panels at least every meter, as well as in the upper and lower parts of the formwork;
- Between the holes in opposite shields, a piece of pipe is installed with a length equal to the width of the foundation;
- A hairpin is threaded.
- Wide washers made of metal plates are installed.
- The nuts are tightened.

After pouring the foundation, when dismantling the formwork, the pins can be easily removed thanks to the tubes used.
The studs can be reused on a different foundation.
Pouring strip foundation
After the formwork is ready and reinforced, it is necessary to calculate the exact volume of the required concrete, this is done by multiplying the wall length, the height and width of the foundation (the height is taken from the base of the foundation).
It is advisable to fill the strip foundation at one time; for this, it is necessary to pre-order the delivery of concrete. We do not recommend pouring self-made concrete, as this complicates the process, and the "solidity" of the structure deteriorates due to uneven spillage, which leads to the formation of microcracks and cold bridges.
It is important to immediately calculate all the access roads for the mixer with concrete so that the pouring is available from all sides of the foundation. When pouring, it is also advisable to use a deep vibrator for concrete, in order to exclude the formation of air pores in the concrete, which in the future can lead to a violation of the sealing of the foundation and premature destruction.

Rules for pouring a strip foundation
- Concrete is poured in layers of 30-50 cm;
- After pouring each layer, it is necessary to pass the vibrator along the entire length;
- Layer-by-layer fill to the level of the horizontal marking;
- After reaching the level and tamping the top layer, the concrete is leveled and smoothed with a trowel.
Concrete care after pouring
After pouring, the strip foundation requires some care. It is necessary to ensure that the concrete is always wet, this will prevent cracking of the top layer.
Also, in rainy weather, the foundation must be covered with a waterproof material so that the cement is not washed out of the uncured solution.
Such concrete maintenance is necessary for two weeks, after which the formwork can be dismantled. The construction of a house on a new strip foundation must be started no earlier than a month after pouring, during which time the concrete is gaining maximum strength.
Waterproofing strip foundation
After the formwork is removed, it is necessary to provide for the waterproofing of the foundation, the service life of the house directly depends on this. If concrete is not protected from precipitation and groundwater, then it will constantly accumulate moisture in itself, which will lead to its weakening and further destruction.
You can protect the strip foundation from moisture by processing with special construction mastics, which are sold in hardware stores.
Also, a waterproofing layer is needed between the strip foundation and the wall of the house, this is necessary to prevent moisture from entering the walls, which can lead to the formation of fungus in living quarters.
You can see more details about waterproofing the foundation in the following video: